新版 Mac U 盘重装系统的注意事项

由于苹果在新版的 Mac 中内置了 T2 安全芯片,因此当我们在下面这些版本的 Mac 上尝试使用 U 盘重装系统的时候,需要额外注意。

本文章适用的 Mac 型号包括:

主要注意的核心点是:

  1. 不要先格式化硬盘
  2. 不要先删除原系统中的管理员用户
  3. 切记先进 Recovery 模式修改安全芯片选项,再开始重装
  4. 最好先升级到最新的系统再重装

说说原因:

  1. 如果先格式化硬盘,Recovery 模式无法找到有效的管理员账号,不允许修改 T2 芯片的选项
  2. 同 1,删除所有管理员账户会导致无法修改选项
  3. 将安全芯片选项修改为 No Security + Allow booting from external media 之后,再进行重装,防止重装操作被安全芯片拦截。
  4. 遇到很多诡异的问题就算将安全芯片选项修改了也不生效。但是有时候又是生效的。所以最好升级到最新的啦

https://support.apple.com/en-us/HT208330

修复 Mac OS X 新版 Terminal 在 SSH 时候出现的 LANGUAGE WARNING

自从升级了新版的 Mac OS X 之后,使用 Terminal SSH 到别的机器上总是能看到这样的警告:

-bash: warning: setlocale: LC_CTYPE: cannot change locale (UTF-8): No such file or directory

在执行 perl 脚本的时候还能看到这样的警告:

perl: warning: Setting locale failed.
perl: warning: Please check that your locale settings:
    LANGUAGE = (unset),
    LC_ALL = (unset),
    LANG = "en_US.UTF-8"
are supported and installed on your system.
perl: warning: Falling back to the standard locale ("C").

找了很多方法,包括改服务端 sshd config 什么的,都觉得不好。因为这应该不是服务端的问题,不应该在服务端解决。于是仔细搜索之后发现这个回答完美解决了这个问题:

http://stackoverflow.com/questions/2499794/how-can-i-fix-a-locale-warning-from-perl/7413863#7413863

Here is how to solve it on Mac OS Lion (10.7):

Add the following lines to your bashrc or bash_profile on the host machine:

# Setting for the new UTF-8 terminal support in Lion
export LC_CTYPE=en_US.UTF-8
export LC_ALL=en_US.UTF-8

If you are using zsh, edit zshrc:

# Setting for the new UTF-8 terminal support in Lion
LC_CTYPE=en_US.UTF-8
LC_ALL=en_US.UTF-8

How to Start the Mac Screen Saver with a Keyboard Shortcut in OS X

start-screen-saver-keystroke-mac

Have you ever wanted to initiate the screen saver of your Mac by hitting a keystroke combination? You’re not alone, and that’s what we’re going to show you how to do here. While OS X does not include this feature by default, we’ll demonstrate how to create an Automator system service that will accomplish the same feat, activating the screen saver by a keyboard shortcut of your choosing.


To be clear, this service will start the default screen saver, meaning whatever has been selected in the Desktop & Screen Saver preference panel, accessible from the  Apple menu and System Preferences. If you want to change the screen saver used by this, simply change it there. For best results, use the screen saver with general password protection too, which will let the keystroke be used as a way to protect the Mac when you’re away from the keyboard or desk.

Part 1: Create a Screen Saver Automator Service for OS X

    1. Launch Automator, found in the /Applications/ directory
    2. Choose to create a new “Service”

create-new-service-automator

    1. Use the search box to find “Start Screen Saver” and drag that into the right side panel
    2. Change “Service receives” to “no input”

make-screen-saver-service-automator-mac

    1. Go to the File menu and choose “Save” naming it something obvious like “Start Screen Saver”

save-screen-saver-keystroke-service

Now that you have created a service that starts the default screen saver, you need to assign a keystroke combination to initiate the service. Be sure to pick a keyboard shortcut that is unique and easy to remember.

Part 2: Set the “Start Screen Saver” Keystroke for Mac OS X

    1. Open System Preferences from the  Apple menu
    2. Choose the “Keyboard” preference panel then go to the “Shortcuts” tab
    3. Select “Services” from the left side menu
    4. Locate the newly created “Start Screen Saver” service you made, and click on the ‘add shortcut’ button to set your keyboard shortcut to use – in this example we used Control+Command+Option+Down Arrow but you can set whatever you want

set-keystroke-for-screensaver-mac

  1. Exit out of System Preferences and test out your new screen saver keystroke

You can try it out by hitting the set keyboard shortcut sequence, which will now initiate the screen saver immediately.

keystroke-for-screen-saver-mac-610x350

To use this as a variation of the lock screen trick that doesn’t sleep the Mac display, be sure you have set a locked screen password and required the password be used to wake the Mac from a screen saver. That’s handled in the Security & Privacy preference panel under the “General” tab.

Keep in mind you can always use hot corners to start the Mac screen saver too, which for some individuals may be faster and easier to remember than a keystroke, since you simply need to slide the cursor into one of the far screen edges to initiate a hot corner.

How to Change the Profile Picture of a Mac User Account

The first time you set up a Mac or new user account, you’re asked to pick a profile picture for that account. Most of us set this image once and don’t think much about it, but that profile picture follows us around in OS X and is visible at each boot login menu, in the Fast User Switching menu, visible to other users with AirDrop, and plenty of other places in Mac OS X.

If you decide you want to change that user profile picture, perhaps to a more generic image, a mugshot, or a custom photo, you can do so at any time, and for any user account on the Mac. We’ll show you two ways to do this.

Changing a User Profile Picture in Mac OS X

    1. Open System Preferences from the  Apple menu and then select “Users & Groups” from the panel list
    2. Select the user account to change from the left side (choose the current user to change your own), you must have admin privileges to change other users profile pictures
    3. Click the current profile picture to pull down a list of options, select any of the following:

change-profile-pic-mac-user

      • Defaults – the Apple included profile picture choices
      • Recents – recently used profile photos (if you’ve changed it before, they will be listed here)
      • iCloud – photos from iCloud will show up here, including pictures taken with the iPhone
      • Faces – pictures identified as faces by iPhoto or Aperture
      • Camera – opens the FaceTime Camera to take a new picture

change-user-profile-picture-mac-default-choices

  1. Choose an image, adjust if desired, then click “Done” to set as the new profile picture
  2. Close out of System Preferences

Using a Custom Image or Photo as the Profile Picture in Mac OS X

The first approach let’s you choose from either a variety of Apple bundled default options, iCloud pictures, and the FaceTime camera, but what if you have an image file you want to use as the profile picture instead? That’s also easy to change, you can do it with a simple drag and drop:

  1. Open the “Users & Groups” preference panel as usual
  2. Drag and drop an image file into the existing profile picture thumbnail
  3. Adjust as necessary and click “Done” to set the image as the profile picture

Dragging and dropping works best from a Finder window, like so:

drag-drop-to-change-profile-pic-mac-user

You can use the little slider tool to both crop or zoom in and out on the picture, choosing “Done” sets the changed image as the profile picture for that Mac user.

choose-done-to-set-new-profile-pic-mac

Close out of System Preferences and go about your business, that’s all there is to it.

Remember that the profile picture is broadcasted to the world on AirDrop, so for users in public environments, you may want to aim for a boring and professional image.

This can also be a good trick to make a customized guest user account much more obvious, since by default the guest user it’s just a blank face image.

Maintain & Recall Command Line Clipboard History with iTerm 2

iterm2-icon

Mac users who spend a lot of time at the command line have yet another reason to use iTerm 2 as their default terminal client; clipboard history. Added in the most recent version of iTerm, a running history of OS X clipboard activity can be natively stored, recalled, and summoned directly in iTerm2, accessible through a handy new feature panel called Toolbelt.


You’ll need the latest version of iTerm 2 (you can grab the newest version here) to have access to the Toolbelt and Paste History features, then you just need to launch iTerm 2 and hit Command+Shift+B to summon the tool belt. Be sure the ‘Paste History’ option is enabled in Toolbelt menu to have the feature visible with a simple keystroke toggle.

command-line-clipboard-history-iterm2

Choosing any Paste History entry will immediately re-enter the syntax where ever the prompt is located.

The clipboard history doesn’t just store commands, it stores everything bound to the clipboard (including entries from pbcopy), making it perfect for holding onto everything from lengthy commands to code snippets and IP addresses. Sure, there are some great third party utilities like ClipMenu that will keep a running tally of all clipboard activity in OS X and have it accessible through a menu bar item, but as heavy command line users know, having easy access to things without leaving the task at hand can be absolutely critical to maintaining workflow.

Separately, you’ll also find the new Toolbelt feature of iTerm2 includes a handy little notes sheet, a profile manager, and a very nice jobs/process manager complete with signal sending. So while the occasional command line user may get by fine with using the default Terminal app bundled with OS X, power users will continue to find immense value in iTerm2 with it’s speed and myriad of advanced features.

git commit 出现There was a problem with the editor ‘vi’

今天在Mac OS X 10.9.3上使用git的时候遇到这么一个问题,执行git commit操作会显示如下错误:
There was a problem with the editor ‘vi’

搜寻了一下相关的解决方案,发现好多人遇到了这个问题。似乎是因为vim的返回值有问题导致的。
所以执行一下下面这条命令:
$ git config –global core.editor /usr/bin/vim
将git使用的编辑器强制指定一下,就可以正常使用了。具体的错误分析就不翻译了,贴在下面:

I have had an annoying problem with git and vi. I like to use vim to edit my commit messages, but I’ve been hit with this annoying message every time I write the message and quit vim.

error: There was a problem with the editor ‘vi’
After a little bit of digging I found that this message is shown by git when the editor exits with a non-zero exit code. You can use $? to see the exit code of last script or application.

$ vim # then exit vim with :q immediately
$ echo $?
1
I’m still not sure why vim is exiting with non-zero exit code, but it is definitely related to my .vimrc – moving it to .vimrc.bak seemed to fix the problem. I’m using the excellent pathogen plugin to manage my vimfiles, so I plan to go through that and my installed plugins to find the cause of the problem.

There is a fix though, I’m not sure what’s causing this, but I found a post on the vim-mac mailing list which shows this:

$ vim # and exit with :q
$ echo $?
1
$ /usr/bin/vim # and exit with :q
$ echo $?
0
$ which vim
/usr/bin/vim
Running vim with /usr/bin/vim seems to make it exit cleanly. So to fix the problem with git commit you just need to run this:

$ git config –global core.editor /usr/bin/vim
I’d still like to get to the root of the problem, but this gets me my git commit messages back!

OS X 支持 NTFS 读写

苹果的 OS X 明明已经支持 NTFS 分区读写, 但是默认情况还是按只读挂载, 查了些资料小修改了下, 就可以开启原生读写了
# 用 root 身份做如下操作 (高危! 请切记自己在干什么)
sudo -s

cd /sbin
# 将系统自带的挂载程序改名
mv mount_ntfs mount_ntfs_orig
# 新建我们要的挂载脚本并编辑
vim mount_ntfs

mount_ntfs
#!/bin/sh
/sbin/mount_ntfs_orig -o rw "$@"

# 保存退出后改一下权限
chmod a+x mount_ntfs
# 都搞定了, 退出 root 身份
exit

不过这个方法还有几个小问题要注意

1. 分区最好有卷标, 默认的 “未命名磁盘” 可能无法挂载. 如遇无法自动挂载可以先在终端下改个名再试
# 获取对应分区的 DiskIdentifier (类似 disk1s1 这样的)
diskutil list
# 分区重命名
diskutil rename disk1s1 newname

2. 网络上其他方法经常会让把脚本里的挂载参数加上 nobrowse, 这个参数就让挂载的分区不显示成新的移动磁盘, 然后又有一堆方法教怎么在 finder 侧边栏能快速访问这样挂载的 NTFS 分区. 其实 man mount 看明白 -o 参数后面的设定就明白了, 去掉那个画蛇添足的 nobrowse 吧

// 最后这个 nobrowse 的参数, 似乎加上后又是只能在 finder 显示但是不能写, 搜了下也没有合理的解释, 如果不行还是先加回去吧
// 为了方便访问, 可以在 finder 里用 cmd+shift+G 打开跳转, 输 /Volumes 进入所有磁盘目录, 然后在用 cmd+shift+T 将 /Volumes 保存到边栏

Mac OS 禁止apache httpd自动启动

mac os不像linux有/etc/init.d/rc.local以及service的方式可以设置程序随机启动,而是使用plist文件管理。
plist文件分布在:/System/Library/LaunchDaemons/中的最多,其中apache的httpd程序启动配置文件org.apache.httpd.plist就在这里。
但这些配置文件可由程序launchctl设置是否加载。也就是说,在launchctl list命令结果中出现的plist文件才会有效。
launchctl需要root权限。
禁止其随机启动方法:

sudo launchctl unload -w /System/Library/LaunchDaemons/org.apache.httpd.plist

如果没有任何输出就是成功卸载了。如果要加载,把unload换成load即可。
第二次运行unload会发现错误:launchctl: Error unloading: org.apache.httpd,这表示已经成功卸载了。

如果要查看launchctl用法,可以在shell终端输入launchctl,然后输入help回车。quit退出。

我在我的mac上操作成功,重启后httpd不会启动了。但奇怪的是当我自己用apachectl启动了httpd后,第二天开电脑发现httpd又自动启动了。于是我怀疑是否apachectl脚本里将其load了,打开/usr/sbin/apachectl,发现启动httpd竟然使用了launchctl的load方法。

为了让启动与否的主动权掌握在我自己手里,只好抛弃使用apachectl启动,使用自己写的httpd脚本启动,其实就是里面实现一下start,stop,restart三个条件判断即可,我使用时间长一些,所以稍复杂一些,见附件。

apachectl.tar.gz

替换后,别忘记再运行一次:
sudo launchctl unload -w /System/Library/LaunchDaemons/org.apache.httpd.plist

Claim back disk space from Mail.app (Gmail)

There is a good chance you read your mail from Gmail with Mac’s native Mail app. There is also a good chance you never really paid attention to how much disk space all this content synced with Gmail IMAP really takes up. Having recently replaced my internal 160 GB hard drive with an Intel X25-M SSD drive half the size, I’m naturally eager to strip all the unnecessary stuff out of the system in order to save some SSD space. So how to free a few gigabytes of space from Gmail?

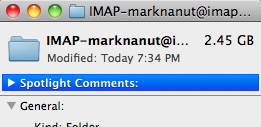
This question has long been lingering around, it’s just that I didn’t care about it when I still had disk space to throw away: Why does ~/Library/Mail/IMAP-marknanut[…] folder take up almost triple the size (some 7 GB) of the amount of actual mail being shown in my Gmail web account (some 2.5 GB)? Gmail messages seem to take up too much space when used with Mail.app (or any other client that uses IMAP, really). Right click on the “IMAP-youraccountname” folder and select Get Info to see its size:
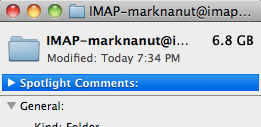
imap-markn

gmail

Ok, this isn’t that hard to find out and goes roughly like this: Gmail’s tags are not exactly compatible with IMAP’s folder logic, thus being displayed as folders in IMAP. In very rough terms: a mail with multiple tags, say 2 or 3 tags, gets locally copied to the same number of folders with these tag names (2 or 3 folders). If you do a Spotlight search in Mail, you’ll usually get duplicate results – for instance the same received mail message appears in “All Mail”, “Inbox”, also “Starred” and so on, whereas a sent message appears in “Sent Mail” and “Sent”.

duplicates

It would obviously be best to prevent Mail.app from downloading folders where there are most certainly mail duplicates. You’ll figure it best for yourself, but for a start we can eliminate the “All Mail” folder. So how to do it?

Inspired by the post of Rajiv Pant, I went to my Gmail settings, and under Labs section I enabled “Advanced IMAP controls”.
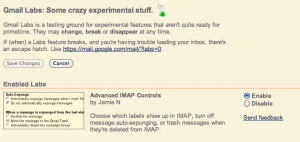
labs

Next uncheck all tags (folder) you don’t want to download locally (for instance “All Mail”) in the Labels section.
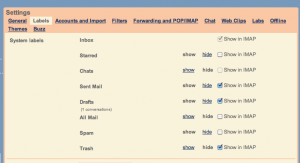
labels

I also unchecked “Starred” and “Spam”. I restarted Mail.app, and voila – no All Mail, Starred and Spam folders, no duplicates and more than 4 GB extra space.
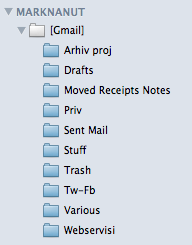
foldrs

imap-markn

Which IMAP folders you’ll prevent from downloading, is of course up to you to figure out. I wish you success. Check out Rajiv Pant’s post too. 

[转]自制可更新MAC版国服魔兽世界

        无论是黑苹果还是白苹果,mac下病毒比窗口少这是不争的事实。5.2马上来临,你的mac准备好了吗?还在为mac下客户端每次升级担心?还在windows下更新而后拷贝到mac下?希望一个一劳永逸的法子?那么你最好看下。


       特别提示,有异议请勿看,可能《X-Only》Huan.Zuo大大发布的补丁更适合您。


不废话了,直接开始。

(本人系统为OSX Mountain Lion 10.8.2,经测试10.7以上均可使用。)

工具/原料

  • 原理

    1、全球版本大统一

    2、更新和登陆目前是Config.wft文件控制

  • 台服或者美服安装包

    美服安装包下载地址

    下载页面 https://us.battle.net/account/download/

    安装包 http://dist.blizzard.com/downloads/wow-installers/full/World-of-Warcraft-Setup-enUS.zip

    台服安装包下载地址

    下载页面 https://tw.battle.net/account/download/

    安装包 http://dist.blizzard.com/downloads/wow-installers/full/World-of-Warcraft-Setup-zhTW.zip

    (不放心的自己登陆战网台服美服的主页,找下载页面还是很容易的。)

全新安装

  1. 下载完成后解压到任意位置,点击开始安装。安装开始需要输入一次密码。

    3801213fb80e7bece631fac42e2eb9389b506b28
  2. 点击INSTALL开始安装。

    fcfaaf51f3deb48f49ba58fbf11f3a292cf578c0
  3. 这个过程和windows下区别不大,反而和mac下的dmg安装直接拖放直想要的文件夹不同。选择语言就不用了,除非你想安装西班牙语或者葡萄牙语。选好保存位置,滚动条拉到最下方,点击AGREE,开始安装。


    然后就是开始漫长的等待了,本人是8M网速下载速度1MB/s的左右,大概用了6个小时。基本上是满速。这个过程很让人难熬,后面也给出已有完整客户端另外的方法。  //其实这一步不需要等待,新版本的登陆器是可以边下边玩的,所以等到运行按钮变成红色可点就可以关掉启动器进行下一步了。

    a50f4bfbfbedab642571b5e5f636afc379311e97
  4. 安装完成后不要着急进入游戏,进入游戏安装文件夹中找到Data文件夹,新建一个名为zhCN的空文件夹,如果有英文语音需求可以多增加一个enCN的文件夹。

    4e4a20a4462309f7fe335537730e0cf3d7cad6b3
  5. 运行World of Warcraft Launcher.app。这时候客户端会开始更新,依旧是漫长的更新,不过这次会比上次情况好很多。


    等待更新完成,关闭更新器。 再次进入游戏安装文件夹中找到WTF文件夹,找到Config.wft文件。

    cefc1e178a82b9017ffa3b16728da9773912ef44
  6. 使用文本编辑器打开。找到以下内容


    SET locale “enUS”

    SETinstallLocale “enUS”

    SETportal “us”


    locale 此项为为你要使用的语系,选项有:

    zhCN(简体中文)、enCN(简体中文-英文语音)、enUS(美国英文)、zhTW(繁体中文)、enTW(繁体中文英文语音)


    portal 此项为你要登录的服务器,选项有:

    cn(大陆)、tw(台服)、us(美服)


    修改 SET portal “us”为 SET portal”cn”,没有的话直接添加就可以。


    SETlocale “enUS”可以不修改,这个可以在客户端设置中修改设置。在这里直接修改为 希望的语系语音例如: SET locale”zhCN”。如果没有安装相应的语言语音文件,尽量不要选择,否则运行World of Warcraft Launcher.app或者Worldof Warcraft-64.app后会自行下载语音包,造成程序假死但是实际在后台下载的假象。

    编辑完成后保存文件。


    至此,完整的mac客户端已经完成。

  7. 打开World ofWarcraft-64.app,直接开始游戏即可。

    修改界面内容的也可在此更改。


    d31b0ef41bd5ad6ed5b19ccf80cb39dbb6fd3c4e
  8. 至于插件,直接下载好整合插件或者自己喜欢的单独插件放置Interface\AddOns下即可直接使用。如果你们习惯了使用插件大脚墨盒等下载器……那就没办法了,能力有限。

    b3119313b07eca80fd3ac2c2902397dda14483dc
  9. 另外关于字体的更改,本人没有解决,只解决了英文字体,解决方式还不完美,暂时不放了,只有求其他大神解决了。

针对已有完整客户端玩家

  1. 如果已经有了完整客户端,再去下载20个多G的客户端有些难办,不过直接使用美服的话肯定是原汁原味未和谐。

    第一步和全新安装区别不大,

    选好保存位置,滚动条拉到最下方,点击AGREE,开始安装。

    6159252dd42a2834b142ce2e5ab5c9ea15cebf2b
  2. 等待片刻文件夹中有了基本的文件(起码有文件夹后)后关闭安装器,将已有的客户端覆盖刚才安装的目录。

    f703738da97739128a0b7e44f9198618367ae2e2
  3. 如果使用的时美服台服客户端,在Data文件夹,新建一个名为zhCN的空文件夹,如果有英文语音需求可以多增加一个enCN的文件夹;如果使用的时国服客户端,什么也不用做。然后继续打开安装器继续安装过程,这时候会发现安装条很快,需要更新的文件很少了。

  4. 完成更新后,此处和全新安装又一致了,进入游戏安装文件夹中找到WTF文件夹,找到Config.wft文件修改。

    修改 SETportal “us”为 SET portal “cn”,没有的话直接添加就可以。


    更新问题,可能会因为美服台服更新时间不一致,直接使用Launcher.app登陆可能会使客户端提前更新造成无法登录国服,不过过了更新阶段,国服和美服台服版本全部更新之后就没有问题了。至于担心的国内版本号不一致问题直接忘了吧,这些是TBC和WLK时期的事情了。