Word中行末空格不显示

今天在弄一个申请书的时候遇到了一个小问题,某一行行末需要空格留白加下划线。但是右对齐之后发现输入的空格全都跑到页面之外了,而且无法添加下划线,加了也没用。纠结了半天,在微软的帮助中心找到了答案。

http://support.microsoft.com/kb/97793/zh-cn

这是Word的一个特性,在 Word 中,您不能应用下划线字符格式设置为只包含空格行。如果您尝试将应用这种类型的格式设置为空格字符,下划线不显示或打印。

如果实在需要的话,使用以下过程之一来扩展行上文本的末尾的下划线:

  • 要停止的下划线的行结尾处键入至少一个非换行空格。若要键入非换行空格,请按 CTRL + SHIFT + 空格键。

    -或者-

  • 在您要停止的下划线的位置设置一个右对齐制表位。应用下划线格式选项卡。

    -或者-

  • 设置带有实线,下划线引线右对齐的制表位。要执行此操作,请单击在制表符对话框 (格式菜单) 中选择引线 4 选项按钮。

如果您应用隐藏和下划线字符的格式设置为文本,下划线格式将显示在屏幕上,但它既不在打印预览中显示和打印。

Download the Windows 8.1 ISO using a Windows 8 key and some simple trickery

It’s great that Microsoft has made Windows 8.1 entirely free to owners of Windows 8, but unfortunately you’re limited to installing the update through the Windows Store — unless you’re an MSDN subscriber there’s no ISO you can grab to install the operating system how and when you like.

But as enterprising Reddit user redditorfor0seconds has discovered, there is a way of getting your hands on the ISO that only requires you to have a Windows 8 retail or MSDN key (but not an OEM key, apparently). It’s incredibly straightforward too, just follow these simple instructions:

  1. You’ll need to download both the Windows 8 and 8.1 installers from Microsoft. They’re 5.2Mb and 4.7MB respectively.
  2. Launch the Windows 8 installer (Windows8-Setup.exe).
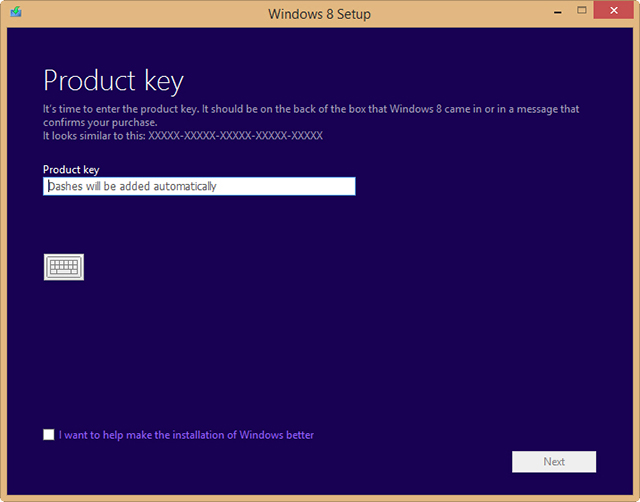
  3. Enter your key when prompted and start the download process.
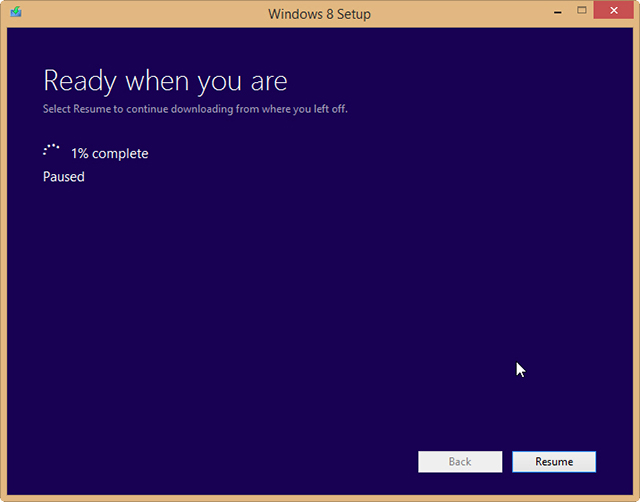
  4. Pause (don’t quit) the download when it hits exactly 1 percent.
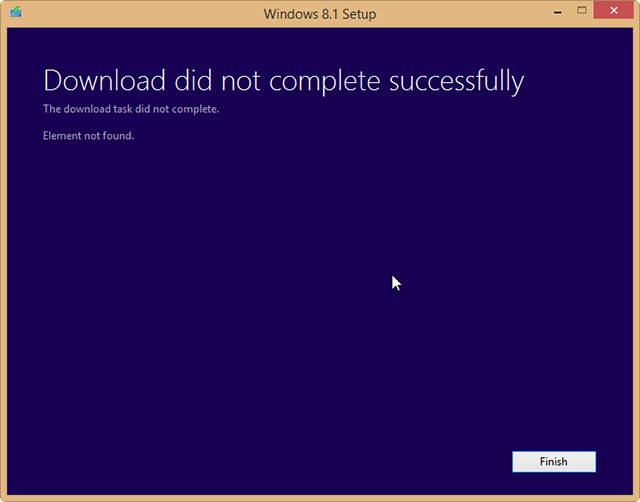
  5. Exit that installer and launch the Windows 8.1 installer (WindowsSetupBox.exe). This will generate an error saying “The download task did not complete. Element not found”.
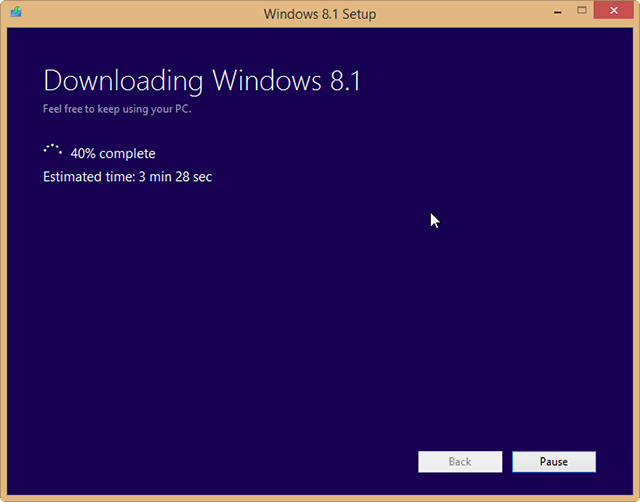
  6. Close the setup window and re-run WindowsSetupBox.exe. The download will begin.
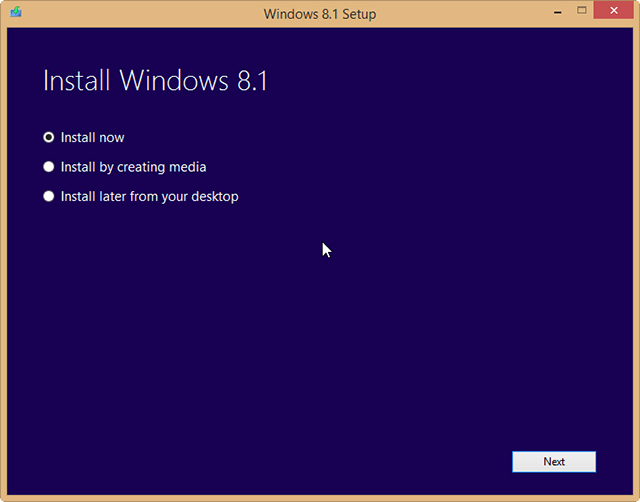
  7. When it’s finished, you’ll be asked what you want to do — “Install now”, “Install by creating media” or “Install later from your desktop”. Select the option to create media.
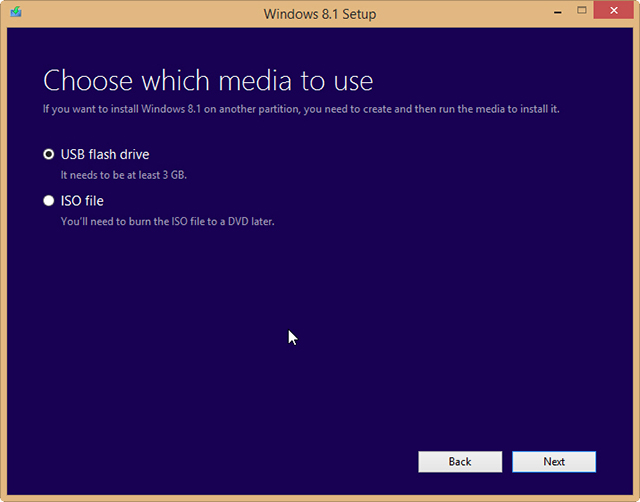
  8. You can choose to use a USB flash drive, or create an ISO file. If you select the second option, you’ll be asked where you want the file saved to.
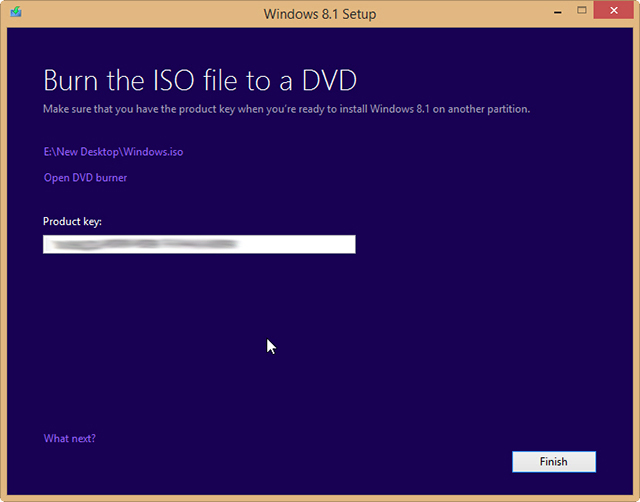
  9. You’ll then be prompted to burn the ISO file to a DVD, with your Windows 8 key shown. You can skip this step if you don’t want to make a DVD.

The method worked perfectly for me, but your mileage may vary. If you try it let me know how you get on in the comments below.

Claim back disk space from Mail.app (Gmail)

There is a good chance you read your mail from Gmail with Mac’s native Mail app. There is also a good chance you never really paid attention to how much disk space all this content synced with Gmail IMAP really takes up. Having recently replaced my internal 160 GB hard drive with an Intel X25-M SSD drive half the size, I’m naturally eager to strip all the unnecessary stuff out of the system in order to save some SSD space. So how to free a few gigabytes of space from Gmail?

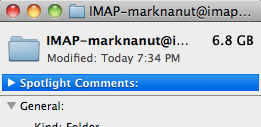
This question has long been lingering around, it’s just that I didn’t care about it when I still had disk space to throw away: Why does ~/Library/Mail/IMAP-marknanut[…] folder take up almost triple the size (some 7 GB) of the amount of actual mail being shown in my Gmail web account (some 2.5 GB)? Gmail messages seem to take up too much space when used with Mail.app (or any other client that uses IMAP, really). Right click on the “IMAP-youraccountname” folder and select Get Info to see its size:

imap-markn

gmail

Ok, this isn’t that hard to find out and goes roughly like this: Gmail’s tags are not exactly compatible with IMAP’s folder logic, thus being displayed as folders in IMAP. In very rough terms: a mail with multiple tags, say 2 or 3 tags, gets locally copied to the same number of folders with these tag names (2 or 3 folders). If you do a Spotlight search in Mail, you’ll usually get duplicate results – for instance the same received mail message appears in “All Mail”, “Inbox”, also “Starred” and so on, whereas a sent message appears in “Sent Mail” and “Sent”.

duplicates

It would obviously be best to prevent Mail.app from downloading folders where there are most certainly mail duplicates. You’ll figure it best for yourself, but for a start we can eliminate the “All Mail” folder. So how to do it?

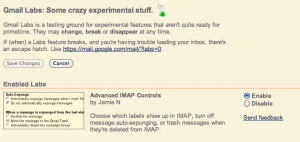
Inspired by the post of Rajiv Pant, I went to my Gmail settings, and under Labs section I enabled “Advanced IMAP controls”.

labs

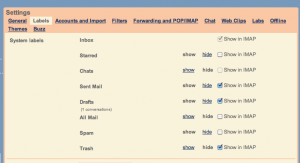
Next uncheck all tags (folder) you don’t want to download locally (for instance “All Mail”) in the Labels section.

labels

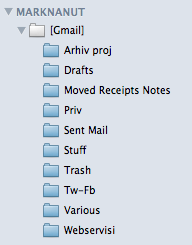
I also unchecked “Starred” and “Spam”. I restarted Mail.app, and voila – no All Mail, Starred and Spam folders, no duplicates and more than 4 GB extra space.

foldrs

imap-markn

Which IMAP folders you’ll prevent from downloading, is of course up to you to figure out. I wish you success. Check out Rajiv Pant’s post too. 

[转]由一张不科学的图片说起

【转载本文不写出处的,男的木丁丁,女的满脸都是丁丁】

出自http://chichou.0ginr.com/blog/328

昨晚上偶然看到个比较坑爹的日志,正文有一张图片,在好友动态列表查看的时候可以显示自己(不是发日志的好友,是你自己)的头像和QQ号码、昵称。正文的文字称,这是“本年度最给力神奇魔力日志(转载会看到你最熟悉的身影)”,并且在文章底部附加了一个发广告的QQ号码。

由于这张坑爹图片的存在,文章转发量短短三天内过千。这招可比那些疯狂加群发广告的来的更有创意和杀伤力,转载传播图片(包括日志当中的广告)的人几乎是全网用户(跟所谓病毒营销差不多了)。好奇的话可以看这篇日志最初来源:hXXp://user.qzone.qq.com/732678621/blog/1363502247

一看就知道是检测referer的把戏。早在几年前BBS还在流行的时候,很多人设置的签名图具有天气预报、客户端信息(浏览器、操作系统、IP所在地之类)、随机笑话、倒计时等五花八门的功能。这都得益于服务器端脚本的图像处理功能。而客户端的检测则是基于HTTP请求中的UserAgent和Referer等信息。

但是印象中QQ空间为了防止referer潜在的安全问题和防止图片被防盗链下了很大功夫,凡是发表到QQ空间的日志,正文都会把引用到的所有第三方图片资源缓存到腾讯的云端上。所以直接在日志正文中引用的图片,是不会提交REFER到我们的服务器脚本上的。

更新:有人发现只要响应HTTP请求的时候输出状态200,但不输出任何内容,腾讯就不会缓存这张图。

文中特别称,“请转载后用电脑进入个人中心看”。为什么要特别说明是“个人中心”呢?我刷新了好久的动态,终于看到了图片所说的效果。页面生成的DOM代码为:

1
2
3
 onload="QZFL.media.reduceImage(0,400,300,{trueSrc:'http:\/\/qq.sennvwu.com\/qzone\/do.php',callback:function(img,type,ew,eh,o){var _h = Math.floor(o.oh/o.k),_w = Math.floor(o.ow/o.k);if(_w<=ew && _h>=eh){var p=img.parentNode;p.style.width=_w+'px';p.style.height=_h+'px';}}})"
 width="400">

原来QQ空间还是会显示源地址的图片的,仅限于在“个人中心”。这时候请求图片附带的HTTP_REFERER的值为

http://user.qzone.qq.com/123456789/infocenter

号码就是这样提取到的。如果REFERER不满足条件,这个php将在header中发送Location跳转到同一目录下的no.png。

那么后台是如何取到QQ头像、昵称等信息的呢?我Google到了一个腾讯的WebService接口:

http://base.qzone.qq.com/fcg-bin/cgi_get_portrait.fcg?uins=123456789

不需要任何凭证信息即可获取uins指定的QQ号码的头像、昵称信息,返回的格式为JSON。另外上面的图片还有一个显示地理位置和ISP的功能,这个就比较常见了。我找到了一个比较好用的接口,来自TB:

http://ip.taobao.com/service/getIpInfo.php?ip=127.0.0.1

格式同样也是JSON。

接下来实现这个效果就比较简单了,通过REFERER检测用户的QQ号码,然后在后台下载头像、昵称等信息,用GD函数绘制上图片,返回客户端。

我也折腾了一个‘神奇图片“发到空间,居然捉弄了一群人。下面是php语言的实现代码。为了减少后端的流量,对下载的头像做了缓存处理:

001
002
003
004
005
006
007
008
009
010
011
012
013
014
015
016
017
018
019
020
021
022
023
024
025
026
027
028
029
030
031
032
033
034
035
036
037
038
039
040
041
042
043
044
045
046
047
048
049
050
051
052
053
054
055
056
057
058
059
060
061
062
063
064
065
066
067
068
069
070
071
072
073
074
075
076
077
078
079
080
081
082
083
084
085
086
087
088
089
090
091
092
093
094
095
096
097
098
099
100
101
102
103
104
105
106
107
108
error_reporting(0);
ob_start();
header('Content-Type: image/png');
define('IMG_NO', "no.png"); #刚开始显示的提示信息
define('IMG_BACKGROUND', "background.png");
define('IMG_WIDTH', 400);
define('IMG_HEIGHT', 128);
define('FONT_NAME', "AdobeHeitiStd-Regular.otf"); #字体文件名
define('CACHE_PATH', rtrim(realpath("./cache"), '/').'/'); #缓存目录
define('CACHE_EXPIRE', 60*60); #缓存时间,单位秒
#(!is_dir(CACHE_PATH) && is_writable(CACHE_PATH)) || die;
/*
 $remote: 远程URL
 $local: 本地缓存路径
 $expire: 过期时间。为-1时,永久不更新缓存
*/
function load_from_cache($remote, $local, $expire = CACHE_EXPIRE, $as_path = false) {
 //过滤潜在的危险字符
 $local = preg_replace("/[.\/\\\?\*\'\"\|\:\<\>]/", "_", $local);
 $cache = CACHE_PATH.$local;
 //查找缓存
 if(file_exists($cache) && ($expire = -1 || filemtime($cache) - time() < $expire))
 return $as_path ? $cache : file_get_contents($cache);
 //文件不存在或缓存过期,重新下载
 $content = file_get_contents($remote);
 file_put_contents($cache, $content);
 return $as_path ? $cache : $content;
}
/*
 返回客户端信息。
*/
function client_info() {
 $ip = ($_SERVER["HTTP_VIA"] && $_SERVER["HTTP_X_FORWARDED_FOR"] ?
 $_SERVER["HTTP_X_FORWARDED_FOR"] : $_SERVER["REMOTE_ADDR"]);
 $info = explode('"', load_from_cache($url.$ip, $ip, -1));
 $string = $info[7].$info[23].$info[31].$info[47];
 return json_decode('"'.$string.'"');
}
$referer = $_SERVER['HTTP_REFERER'];
$pattern = "/http:\/\/user.qzone.qq.com\/(\d+)\/infocenter/";
if(preg_match($pattern, $referer, $matches)) {
 //获取QQ号码
 $uin = $matches[1];
 $info = explode('"', load_from_cache(
 $avatar = $info[3];
 $nickname = iconv("GBK", "UTF-8//IGNORE", $info[5]);
 $client = client_info();
//重点来了,生成图片
 try{
 $im = imagecreatefrompng(IMG_BACKGROUND);
//绘制头像
 $avatar_file = load_from_cache($avatar, $uin.".jpg", 60*60*24, true);
 $im_avatar = imagecreatefromjpeg($avatar_file);
 imagecopymerge($im, $im_avatar, 14, 14, 0, 0, 100, 100, 100);
 imagedestroy($im_avatar);
//绘制文字
 $blue = imagecolorallocate($im, 0, 0x99, 0xFF);
$white = imagecolorallocate($im, 0xFF, 0xFF, 0xFF);
$texts = array(
 array(12, 148, 40, $white, $uin),
 array(18, 125, 70, $blue, $nickname),
 array(16, 125, 100, $blue, $client)
 );
foreach($texts as $key=>$value) {
 imagettftext($im, $value[0], 0, $value[1], $value[2], $value[3], FONT_NAME,
 mb_convert_encoding($value[4], "html-entities", "utf-8")); //解决乱码问题
 }
imagepng($im);
 imagedestroy($im);
header("Content-Length: ".ob_get_length());
 ob_end_flush();
 } catch (Exception $e) {
//die($e->getMessage());
 $error = true;
 }
} else {
 $error = true;
}
//更新:在这里直接停止输出即可防止图片被缓存
die();
/*
if($error){
 header('Content-Length: '.filesize(IMG_NO));
 echo file_get_contents(IMG_NO);
}
*/

WORDPRESS把缩进都吞掉了,看上去非常不爽。下面还是直接给出我的打包吧,连图片也有。不过字体文件太大而且有版权纠纷,请自行准备。

QZone Trick


MySQL Binary Log管理

开启Binary log(二进制日志)记录Mysql更新内容,在服务重启或者超出binlog大小上限的情况下mysqld会创建新的binlog,时间长了本地会保留很多binlog,我们应将历史binlog清除


1.刷新日志

mysql > flush logs;

2.查看当然数据库binlog信息

mysql > show binary logs;

+——————+———–+
| Log_name | File_size |
+——————+———–+
| mysql-bin.000023 | 149 |
| mysql-bin.000024 | 149 |
| mysql-bin.000025 | 149 |
| mysql-bin.000026 | 149 |
| mysql-bin.000027 | 149 |
| mysql-bin.000028 | 106 |
+——————+———–+


3.清除历史log,保留最近的

mysql > purge binary logs to ‘mysql-bin.000028’;


4.查看binlog事件

mysql > show binlog events;

+——————+—–+————-+———–+————-+—————————————+
| Log_name | Pos | Event_type | Server_id | End_log_pos | Info |
+——————+—–+————-+———–+————-+—————————————+
| mysql-bin.000023 | 4 | Format_desc | 1 | 106 | Server ver: 5.1.31-log, Binlog ver: 4 |
| mysql-bin.000023 | 106 | Rotate | 1 | 149 | mysql-bin.000024;pos=4 |
+——————+—–+————-+———–+————-+—————————————+


5.查看本地binlog文件

ls -l /data/dbfile

mysql-bin.000028
mysql-bin.index


查看当前使用的Binary log名称

more mysql-bin.index 
./mysql-bin.000023
./mysql-bin.000024
./mysql-bin.000025
./mysql-bin.000026
./mysql-bin.000027
./mysql-bin.000028


备份中清除日志

# mysqldump –flush-logs –delete-master-logs

关于Minecraft 1.7.2 服务端资源包的几点说明

刚刚更新的Minecraft 1.7.2 多了一个很不错的新功能就是服务端可以推荐资源包了。

这样用户无需自己寻找,就可以自动下载安装服务端设置的资源包,可以保证所有用户都使用同样的资源,有相同的体验。

但是在测试这项功能的时候遇到了几个问题,这里写出来给大家参考一下。

1.在server.properties文件中resource-pack= 之后要填写的是完整的资源包下载地址。比如说我的博客下放了一个资源包叫mc.zip,那么这行就应该填写

resource-pack=http://maoxian.de/mc.zip

2.资源包的下载地址有几点需要注意,首先,不能是HTTPS链接,因为MC没法处理使用SSL的链接。其次,该链接必须是直链,不允许有个页面然后点击下载之类的。最后,该链接必须没有防盗链。如果设置了防盗链禁用了无UA或者除了某些UA都禁止下载的话,可能MC没法下载到资源包。

3.资源包的大小必须小于52428800字节,也就是50M。这是MC使用的Java IO函数的处理大小上限,如果资源包超过此上限会直接报错不进行下载。

4.都设置成功后,用户第一次进入游戏如果选择了自动下载并使用资源包,则系统会自动下载,然后自动启用该资源包。但是!该资源包不会在设置中的资源包菜单中显示!不能应用给别的服务器或者单机世界!只能在本服务器使用!而且,每次进服的时候都会加载一次这个资源包,所以如果资源包较大会卡顿很久。而每次退出服务器都会换回之前的资源包,如果之前不是默认资源包的话又会卡顿很久。

综上,本次跟新的这个新特性可以说是一把双刃剑,有好处但是坏处也不少。各位腐竹在设置的时候记得三思~

Sublime 3 Licensed (Sublime 3 Public Beta)

Go to this link and Download your OS Specific Build:

http://www.sublimetext.com/3

Mac OS X

Open Terminal and Type the following:

1. cd /Applications/Sublime\ Text.app/Contents/MacOS/
2. Now Type  “vim Sublime\ Text″
3. Now Change to hex mode in vim by doing this =>  “:$!xxd”
4. Now we will do find and replace ->> “:%s/5BE509C33B020111/5BE509C32B020111/g”

Now open the sublime and enter the below licence key , it should work like a charm.


WINDOWS

For x64: After install, open sublime-text.exe with hex editor. Find and replace “33 42″ with “32 42″. Save and using this license key to register:

—–BEGIN LICENSE—–
Patrick Carey
Unlimited User License
EA7E-18848
4982D83B6313800EBD801600D7E3CC13
F2CD59825E2B4C4A18490C5815DF68D6
A5EFCC8698CFE589E105EA829C5273C0
C5744F0857FAD2169C88620898C3845A
1F4521CFC160EEC7A9B382DE605C2E6D
DE84CD0160666D30AA8A0C5492D90BB2
75DEFB9FD0275389F74A59BB0CA2B4EF
EA91E646C7F2A688276BCF18E971E372
—–END LICENSE—–

You should copy from Begin License till End License.


UBUNTU:

Follow these to register sublime text 3 in ubuntu
1.Install ghex editor.(in terminal,enter “sudo apt-get install ghex”)..without the quotes.
2.In terminal enter “cd /usr/lib/sublime-text″
3.In terminal enter “sudo ghex sublime_text” & enter your password
4.In open ghex window,navigate to Edit>Replace.
5.In the find string section enter 33 42
6.In the replace with section enter 32 42
7.save and exit.


Screen Shot 2013-06-28 at 10.05.24 PM

9 Awesome SSH Tricks

Sorry for the lame title. I was thinking the other day, about how awesome SSH is, and how it’s probably one of the most crucial pieces of technology that I use every single day. Here’s a list of 10 things that I think are particularly awesome and perhaps a bit off the beaten path.

Update: (2011-09-19) There are some user-submitted ssh-tricks on the wiki now! Please feel free to add your favorites. Also the hacker news thread might be helpful for some.

SSH Config

I used SSH regularly for years before I learned about the config file, that you can create at ~/.ssh/config to tell how you want ssh to behave.

Consider the following configuration example:

  Host example.com *.example.net
     User root
  Host dev.example.net dev.example.net 
     User shared
     Port 220 
  Host test.example.com 
     User root
     UserKnownHostsFile /dev/null
     StrictHostKeyChecking no
  Host t
     HostName test.example.org
  Host *
     Compression yes
     CompressionLevel 7
     Cipher blowfish
     ServerAliveInterval 600
     ControlMaster auto
     ControlPath /tmp/ssh-%r@%h:%p

I’ll cover some of the settings in the “Host *” block, which apply to all outgoing ssh connections, in other items in this post, but basically you can use this to create shortcuts with the ssh command, to control what username is used to connect to a given host, what port number, if you need to connect to an ssh daemon running on a non-standard port. See “man ssh_config” for more information.

Control Master/Control Path

This is probably the coolest thing that I know about in SSH. Set the “ControlMaster” and “ControlPath” as above in the ssh configuration. Anytime you try to connect to a host that matches that configuration a “master session” is created. Then, subsequent connections to the same host will reuse the same master connection rather than attempt to renegotiate and create a separate connection. The result is greater speed less overhead.

This can cause problems if you’ want to do port forwarding, as this must be configured on the original connection, otherwise it won’t work.

SSH Keys

While ControlMaster/ControlPath is the coolest thing you can do with SSH, key-based authentication is probably my favorite. Basically, rather than force users to authenticate with passwords, you can use a secure cryptographic method to gain (and grant) access to a system. Deposit apublic key on servers far and wide, while keeping a “private” key secure on your local machine. And it just works.

You can generate multiple keys, to make it more difficult for an intruder to gain access to multiple machines by breaching a specific key, or machine. You can specify specific keys and key files to be used when connected to specific hosts in the ssh config file (see above.) Keys can also be (optionally) encrypted locally with a pass-code, for additional security. Once I understood how secure the system is (or can be), I found my self thinking “I wish you could use this for more than just SSH.”

SSH Agent

Most people start using SSH keys because they’re easier and it means that you don’t have to enter a password every time that you want to connect to a host. But the truth is that in most cases you want to have unencrypted private keys that have meaningful access to systems because once someone has access to a copy of the private key the have full access to the system. That’s not good.

But the truth is that typing in passwords is a pain, so there’s a solution: the ssh-agent. Basically one authenticates to the ssh-agent locally, which decrypts the key and does some magic, so that then whenever the key is needed for the connecting to a host you don’t have to enter your password. ssh-agent manages the local encryption on your key for the current session.

SSH Reagent

I’m not sure where I found this amazing little function but it’s great. Typically, ssh-agents are attached to the current session, like the window manager, so that when the window manager dies, the ssh-agent loses the decrypted bits from your ssh key. That’s nice, but it also means that if you have some processes that exist outside of your window manager’s session (e.g. Screen sessions) they loose the ssh-agent and get trapped without access to an ssh-agent so you end up having to restart would-be-persistent processes, or you have to run a large number ofssh-agents which is not ideal.

Enter “ssh-reagent.” stick this in your shell configuration (e.g. ~/.bashrc or ~/.zshrc) and run ssh-reagent whenever you have an agent session running and a terminal that can’t see it.

  ssh-reagent () {
          for agent in /tmp/ssh-*/agent.*; do
                 export SSH_AUTH_SOCK=$agent
                 if ssh-add -l 2>&1 > /dev/null; then
                         echo Found working SSH Agent:
                         ssh-add -l
                         return
                 fi
         done
         echo Cannot find ssh agent - maybe you should reconnect and forward it?
  }

It’s magic.

SSHFS and SFTP

Typically we think of ssh as a way to run a command or get a prompt on a remote machine. But SSH can do a lot more than that, and the OpenSSH package that probably the most popular implementation of SSH these days has a lot of features that go beyond just “shell” access. Here are two cool ones:

SSHFS creates a mountable file system using [FUSE][] of the files located on a remote system over SSH. It’s not always very fast, but it’s simpleand works great for quick operations on local systems, where the speed issue is much less relevant.

SFTP, replaces FTP (which is plagued by security problems,) with a similar tool for transferring files between two systems that’s secure (because it works over SSH) and is just as easy to use. In fact most recent OpenSSH daemons provide SFTP access by default.

There’s more, like a full VPN solution in recent versions, secure remote file copy, port forwarding, and the list could go on.

SSH Tunnels

SSH includes the ability to connect a port on your local system to a port on a remote system, so that to applications on your local system the local port looks like a normal local port, but when accessed the service running on the remote machine responds. All traffic is really sent over ssh.

I set up an SSH tunnel for my local system to the outgoing mail server on my server. I tell my mail client to send mail to localhost server (without mail server authentication!), and it magically goes to my personal mail relay encrypted over ssh. The applications of this are nearly endless.

Keep Alive Packets

The problem: unless you’re doing something with SSH it doesn’t send any packets, and as a result the connections can be pretty resilient to network disturbances. That’s not a problem, but it does mean that unless you’re actively using an SSH session, it can go silent causing your local area network’s NAT to eat a connection that it thinks has died, but hasn’t. The solution is to set the “ServerAliveInterval [seconds]” configuration in the SSH configuration so that your ssh client sends a “dummy packet” on a regular interval so that the router thinks that the connection is active even if it’s particularly quiet. It’s good stuff.

/dev/null .known_hosts

A lot of what I do in my day job involves deploying new systems, testing something out and then destroying that installation and starting over in the same virtual machine. So my “test rigs” have a few IP addresses, I can’t readily deploy keys on these hosts, and every time I redeploy SSH’s host-key checking tells me that a different system is responding for the host, which in most cases is the symptom of some sort of security error, and in most cases knowing this is a good thing, but in some cases it can be very annoying.

These configuration values tell your SSH session to save keys to `/dev/null (i.e. drop them on the floor) and to not ask you to verify an unknown host:

 UserKnownHostsFile /dev/null
 StrictHostKeyChecking no

This probably saves me a little annoyance and minute or two every day or more, but it’s totally worth it. Don’t set these values for hosts that you actually care about.


I’m sure there are other awesome things you can do with ssh, and I’d live to hear more. Onward and Upward!