什么是 ALPN(应用层协议协商) What is ALPN (Application-Layer Protocol Negotiation)

在没有启用 ALPN 的时候,加载一个 HTTP/2 页面的步骤是:

Without ALPN, the steps to load a HTTP/2 page would be like:

  1. TLS 握手 (TLS handshake)
  2. 浏览器/客户端 发送带有 “Upgrade: h2c” 头的 HTTP/1.1 请求 (Browser/Client speaks HTTP/1.1 to server with “Upgrade: h2c” Header)
  3. 服务器回复 101 Switching 并将链接升级至 HTTP2 (Server responds with 101 Switching to upgrade to HTTP2)
  4. 现在服务器和客户端采用 HTTP2 协议交流 (Now they talks via HTTP2)

在启用了 ALPN 的情况下:

With ALPN, the steps would be:

  1. TLS握手,并且在握手过程中,客户端告诉服务器一个客户端支持的协议列表,然后服务器回复客户端支持 HTTP2 协议 (TLS handshake and in the handshake client tells the server the list of protocol it supports and server respond in handshake saying that it supports HTTP2 as well)
  2. 现在服务器和客户端采用 HTTP2 协议交流 (Now they talks via HTTP2)

可以看出,使用 ALPN 之后,客户端和服务器的交互少了一轮握手(不需要 Upgrade 和 101 Switching)

As you can see there is one less round trip with ALPN (No step of Upgrade and 101 Switching)

RFC: http://tools.ietf.org/html/rfc7301

如何在EXCEL表格中自动生成目录

在使用 Excel 的时候经常会遇到需要创建目录的情况。如果工作表不多的话还好,表一多创建起来就比较麻烦。所以这里就记录一个用宏自动创建目录的方法。

按Alt+F11,在弹出的对话框中点插入选择模块,然后把下面的代码复制到模块中

Sub mulu()
    On Error GoTo Tuichu
    Dim i As Integer
    Dim ShtCount As Integer
    Dim SelectionCell As Range
    ShtCount = Worksheets.Count
    If ShtCount = 0 Or ShtCount = 1 Then Exit Sub
    Application.ScreenUpdating = False
    For i = 1 To ShtCount
        If Sheets(i).Name = "目录" Then
            Sheets("目录").Move Before:=Sheets(1)
        End If
    Next i
    If Sheets(1).Name <> "目录" Then
        ShtCount = ShtCount + 1
        Sheets(1).Select
        Sheets.Add
        Sheets(1).Name = "目录"
    End If
    Sheets("目录").Select
    Columns("B:B").Delete Shift:=xlToLeft
    Application.StatusBar = "正在生成目录…………请等待!"
    For i = 2 To ShtCount
        ActiveSheet.Hyperlinks.Add Anchor:=Worksheets("目录").Cells(i, 2), Address:="", SubAddress:= _
                                   "'" & Sheets(i).Name & "'!R1C1", TextToDisplay:=Sheets(i).Name
    Next
    Sheets("目录").Select
    Columns("B:B").AutoFit
    Cells(1, 2) = "目录"
    Set SelectionCell = Worksheets("目录").Range("B1")
    With SelectionCell
        .HorizontalAlignment = xlDistributed
        .VerticalAlignment = xlCenter
        .AddIndent = True
        .Font.Bold = True
        .Interior.ColorIndex = 34
    End With
    Application.StatusBar = False
    Application.ScreenUpdating = True
Tuichu:
End Sub

复制完成后按F5运行即可,如果后期对表名做了修改,只需要重新进入这个界面按F5运行刷新下目录即可。

如果是在 Mac 下,打开 Excel,选择顶部的视图,查看宏。在打开的窗口中随便写一个宏名称,点击下方的 + 创建一个新的宏,然后将上面的代码粘贴进去执行即可。

曝光一个无良 IDC 商家

之前在 VPS 推荐网站上看到了一个比较便宜的香港独服的推荐,于是就试了一下。一开始用了几个月还不错,于是就一直在用。

结果上个月的时候出现了问题,我的机器被重复售卖给了另一个用户,导致机器被格式化,数据全丢。

然而商家在我反复索要赔偿之后直接再也不回我的消息,直接玩失踪了。所以只好在这曝光一下,希望不要再有人被骗。

竞越互联

www.firstprioritydc.com

QQ:2659488672 2980215596

姓名:苏启耀

银行卡号:6217582000016453151 中国银行

利用API揪出抢占Win8窗口焦点的熊孩纸

起因:谁在抢镜头?!

为了开始Windows Phone 8的开发,这两天将系统升级到了Windows8.1,安装倒是又快又方便的,解压ISO镜像双击Setup一路下一步(嘛其实还输了密钥之类的)就安装好了~
不过不知道为什么去年买的正版密钥激活不了了,于是按照指示拨打了微软的客服电话,客服妹纸问了几个问题就给激活了~然后花了两三个小时进行各种配置美化和常用软件安装,看起来好极了~

01

可耻的晒桌面(其实和之前用Win7时没啥区别……已经一年多没换过主题了……)

刚开始用着感觉没啥问题啊,速度也挺快,可是打开VS写了几行代码就发现有些不对劲了,智能感应总是会莫名其妙的半路消失,然后发现聊QQ时经常打一半字输入法不见了,更糟糕的是逛B站全屏视频时会时不时跳出到窗口模式……根据十几年(啊天哪我怎么这么老了= -)的视窗操作系统(其实就是Windows~听起来逼格高那么一点?)使用经验,首先想到的是焦点被抢占了~之后用一般窗口程序观察了一下,发现的确是这样,时不时就会失去焦点半秒然后再恢复,网上查了一下,大多数说是支付宝安全控件之类的,可是我貌似不是因为这个引起的……那么究竟是谁干的呢?

04

经过:捕捉熊孩子,我有特殊的技巧

作为半个程序猿,当然就要用程序猿的方式解决咯(事实上是因为我找不到其它方法……),很久很久以前就知道了Windows有提供获得焦点窗口句柄(handle,话说为什么要翻译成“句柄”这种不明所以的东西? )的API,看来这次是可以用的上咯~
网上查了查发现不难而且有相关例子,直接打开VS,新建一个WinForm程序,拖了一个Label一个TextBox和一个Timer

00

就这么简单~

Timer设为10ms检测一次焦点窗口并输出相关信息,包括句柄号、进程PID号、进程名称、窗口名称和窗口类名,Label显示句柄号,TextBox记录相关变化
以下为代码

using System;
using System.Collections.Generic;
using System.ComponentModel;
using System.Data;
using System.Drawing;
using System.Linq;
using System.Text;
using System.Threading.Tasks;
using System.Windows.Forms;
using System.Runtime.InteropServices;
using System.Diagnostics;


namespace WindowsFormsApplication1
{
    public partial class Form1 : Form
    {
        [DllImport("user32", EntryPoint = "GetWindowThreadProcessId")]
        private static extern int GetWindowThreadProcessId(
            IntPtr hwnd, //窗口句柄
            out int pid  //输出所在进程的PID
        );//通过句柄获取PID

        [DllImport("user32", CharSet = CharSet.Auto, ExactSpelling = true)]
        public static extern IntPtr GetForegroundWindow();//获取当前激活窗口

        [DllImport("user32", SetLastError = true)]
        public static extern int GetWindowText(
            IntPtr hWnd, //窗口句柄
            StringBuilder lpString, //标题
            int nMaxCount  //最大值
        );

        [DllImport("user32")]
        private static extern int GetClassName(
            IntPtr hWnd, //句柄
            StringBuilder lpString, //类名
            int nMaxCount //最大值
        );

        public Form1()
        {
            InitializeComponent();
            timer1.Start();
        }

        private void Form1_Load(object sender, EventArgs e)
        {

        }

        private void timer1_Tick(object sender, EventArgs e)
        {
            IntPtr myPtr = GetForegroundWindow();
            int pid = 0;

            // 窗口进程PID
            GetWindowThreadProcessId(myPtr, out pid);

            // 窗口标题
            StringBuilder title = new StringBuilder(512);
            GetWindowText(myPtr, title, title.Capacity);

            // 窗口进程
            Process localById = Process.GetProcessById(pid);

            // 窗口类名
            StringBuilder className = new StringBuilder(512);
            GetClassName(myPtr, className, className.Capacity);

            //如果焦点窗体发生变化则记录
            if (label1.Text != myPtr.ToString())
            {
                label1.Text = myPtr.ToString();
                textBox1.Text = DateTime.UtcNow
                    + "\r\n" + pid.ToString()
                    + "\r\n" + localById.ProcessName
                    + "\r\n" + title.ToString()
                    + "\r\n" + className.ToString()
                    + "\r\n\r\n===================================================\r\n\r\n"
                    + textBox1.Text;
            }
        }
    }
}

运行起来一切正常,就差熊孩纸出现了!

点我下载熊孩子探测器

结果:嘿嘿我捉到你了!

写完代码运行了一段时间才猛然发现,在这期间居然没有出现过被抢占焦点的问题,难道狡猾的熊孩纸发现了我的阴谋?
当然这不可能啦~该出现的迟早是要出现的,于是先让它运行着,然后继续聊QQ看视频……
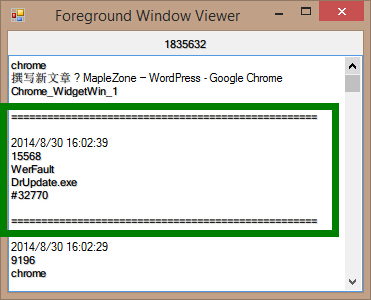
又过了一个小时,熊孩纸终于按捺不止又开始捣乱啦~赶快切换到探测器,终于发现了……

QQ截图20140831000327

原来是这个名为DrUpdate.exe的进程,看名字就知道,这是我们万恶的校园网登入客户端Dr.Com的自动升级进程,

03

这哪里是熊孩子捣乱,分明是州官放火啊
没办法,又不能删掉,试着用资源监视器挂起了这个进程,没想到这货居然会自动重启,最后一怒之下直接把这个文件重命名了……然后一切都安宁了~~

后记

虽然通过重命名执行文件的方式暂时解决了问题,不过后来发现重启电脑或关闭客户端后会导致无法再次打开客户端,于是只能再重命名回来(还好留了个心眼没有直接删掉),等客户端启动后再次重命名,感觉真是麻烦,不过就暂时先这样咯,反正我一般不关电脑的~

SSL 双向认证的一个小问题

最近一直在研究 SSL 双向认证,工作中也经常用到。然后今天遇到了一个非常奇怪的问题,那就是就算配置了

ssl_verify_client optional_no_ca

客户端的访问仍然会失败,证书认证仍然不过。调试了半天,发现了两个问题,那就是:
1. optional_no_ca 并不会像 off 一样放过所有请求,而是对于提交了证书的请求,如果证书验证不过就会握手出错
2. 对于下面这个配置项的设置存在错误:

ssl_verify_depth 1

经过查找资料,找到了这个选项相关的一些说明。(注:以下实验均在 Nginx 和 Apache2.2 上同时进行过)

The depth actually is the maximum number of intermediate certificate issuers, i.e. the number of CA certificates which are max allowed to be followed while verifying the client certificate. A depth of 0 means that self-signed client certificates are accepted only, the default depth of 1 means the client certificate can be self-signed or has to be signed by a CA which is directly known to the server (i.e. the CA’s certificate is under SSLCACertificatePath), etc.

也就是说,当 depth 设置为 1(Nginx 的默认值)的时候,服务端只会接受直接被 CA 签发的客户端证书或自签名的证书。
但是!这段话没说的是,当你放在 SSLCACertificatePath 的文件中的 CA 证书只有中级 CA 的时候,验证仍然是会不过的,看后台的报错会发现:(下面这个是 Apache 的日志,Nginx 的只有 “Error (2): unable to get issuer certificate” 一句)

[Wed Feb 24 04:19:39.975324 2016] [ssl:debug] [pid 13380] ssl_engine_kernel.c(1381): [client xx.xx.xx.xx:48806] AH02275: Certificate Verification, depth 1, CRL checking mode: none [subject: CN=IMM_CA,OU=ROOT,O=ROOT,ST=SH,C=CN / issuer: CN=ST,OU=UP,O=ROOT,ST=SH,C=CN / serial: 02 / notbefore: Jan 14 10:31:00 2013 GMT / notafter: Jan 14 10:31:00 2017 GMT]
[Wed Feb 24 04:19:39.975409 2016] [ssl:info] [pid 13380] [client xx.xx.xx.xx:48806] AH02276: Certificate Verification: Error (2): unable to get issuer certificate [subject: CN=IMM_CA,OU=ROOT,O=ROOT,ST=SH,C=CN / issuer: CN=ROOT_CA,OU=ROOT,O=ROOT,ST=SH,C=CN / serial: 02 / notbefore: Jan 14 10:31:00 2013 GMT / notafter: Jan 14 10:31:00 2017 GMT]

也就是说,直接尝试使用中级 CA 来验证客户端是无法通过的,openssl 会自动的去找中级 CA 的签发者一层层验证上去,直到找到根。
所以,就算将 中级 CA 和 根 CA 都放在信任证书列表中,由于最终 depth 为 2 的缘故,验证还是过不了。

因此,在实际使用的时候,需要注意一下两点:
1. CA 文件中必须同时存在 中级 CA 和 根 CA,必须构成完整证书链,不能少任何一个;
2. 默认的验证深度 SslVerifyDepth ssl_verify_depth 是 1,也就是说只要是中级 CA 签发的客户端证书一律无法通过认证,需要增大该值。

同时还要注意 optional_no_ca 的问题,开了这个选项并不是会放过所有的请求,也会要求证书链完整才能通过。关于这一点个人比较奇怪,因为证书链完整了那就算开 require 应该也能通过了才对。。。
关于这一点做了一些尝试发现以下两种情况:
1. 如果 SSLCACertificateFile/ssl_trusted_certificate SSLCACertificatePath 这两个参数都不设置,那么 optional_no_ca 会放过所有有效的客户端证书(满足客户端证书的基本条件即可);
2. 如果 SSLCACertificateFile/ssl_trusted_certificate SSLCACertificatePath 这两个参数设置了,但是客户端提交的证书并不是这里的 CA 签发的,也会验证成功
但是!如果 SSLCACertificateFile/ssl_trusted_certificate SSLCACertificatePath 这两个参数里设置的证书包括了中级 CA 证书,但是没有包括中级 CA 证书的完整证书链,那么就会报 Error (2): unable to get issuer certificate 错误,验证失败。

修复 Mac OS X 新版 Terminal 在 SSH 时候出现的 LANGUAGE WARNING

自从升级了新版的 Mac OS X 之后,使用 Terminal SSH 到别的机器上总是能看到这样的警告:

-bash: warning: setlocale: LC_CTYPE: cannot change locale (UTF-8): No such file or directory

在执行 perl 脚本的时候还能看到这样的警告:

perl: warning: Setting locale failed.
perl: warning: Please check that your locale settings:
    LANGUAGE = (unset),
    LC_ALL = (unset),
    LANG = "en_US.UTF-8"
are supported and installed on your system.
perl: warning: Falling back to the standard locale ("C").

找了很多方法,包括改服务端 sshd config 什么的,都觉得不好。因为这应该不是服务端的问题,不应该在服务端解决。于是仔细搜索之后发现这个回答完美解决了这个问题:

http://stackoverflow.com/questions/2499794/how-can-i-fix-a-locale-warning-from-perl/7413863#7413863

Here is how to solve it on Mac OS Lion (10.7):

Add the following lines to your bashrc or bash_profile on the host machine:

# Setting for the new UTF-8 terminal support in Lion
export LC_CTYPE=en_US.UTF-8
export LC_ALL=en_US.UTF-8

If you are using zsh, edit zshrc:

# Setting for the new UTF-8 terminal support in Lion
LC_CTYPE=en_US.UTF-8
LC_ALL=en_US.UTF-8

Linux find 与 rm 联动删除符合条件的文件

xargs 方法

find . -name 'file*' -size 0 -print0 | xargs -0 rm

首先 find 找到符合条件的文件并输出文件名,然后管道传递给 xargs,然后由 xargs 拼接出结果。

需要注意的是 -print0 的意思是用一个 \0 作为分隔符,是用来配合 xargs 的 -0 (使用\0作为分隔符)使用的。

GUN find 法

find -name 'file*' -size 0 -delete

GUN find 直接支持了 -delete 参数,甚至还有 -ls 参数,可以自动在找到符合要求的文件之后进行删除或列出详细信息的操作。目前大部分 Linux 发行版用的都是 GUN find,所以该方法比较通用。但是如果你的 Linux 发行版中安装的 find 不支持这两个参数,那么就不能使用这个方法了。

find -exec 法

find . -name file* -exec rm {} \;
find . -name file* -exec rm {} \+

第一行的写法是将找到的文件名拼接到 {} 中,然后执行命令。第二行类似,不同的是把所有文件名拼接成一条命令。也就是说,用方法一,如果 find 的结果是

1
2
3

那么最终就会看到:

rm 1
rm 2
rm 3

这样三个进程。但是使用方法二,则会看到:

rm 1 2 3

只有一个进程,效率更高。

但是需要注意的是,命令参数是有长度限制的,如果文件过多,可能会出现:

cannot execute [Argument list too long]

这是因为参数过多,超过了系统限制。这时候用方法一就能避免这个问题。

Update: 这里说一个 find 命令的小坑。如果想用 find 找到指定大小的文件并删除的话,应该这么写条件:

find ./ -size 100k
find ./ -size 100M
find ./ -size 100G

注意此处是精确匹配。不过可以在数值之前加 +/- 来进行大于或小于的匹配:

find ./ -size +100k #找所有大于 100K 的文件
find ./ -size -100M #找所有小于 100M 的文件
find ./ -size +100G

但是!我上面说的最低的单位都是 K,如果是 Byte 作为单位要怎么办呢?下面两种哪种对?还是都可以?

find ./ -size 100b
find ./ -size 100

实际上,这两种都是错的。来看看实际操作:

➜  test ll
total 8
drwxr-xr-x    3 John  staff   102B May 24 09:53 ./
drwxr-xr-x  118 John  staff   3.9K May 24 09:53 ../
-rw-r--r--    1 John  staff    14B May 24 09:53 test
➜  test find ./ -size 14
➜  test find ./ -size 14b
find: -size: 14b: illegal trailing character
➜  test find ./ -size 14c
.//test
➜  test

可以看出,当单位是 Byte 的时候,正确的写法是用 c 作为单位后缀。具体可见 find 的 man page

       -size n[ckMGTP]
             True if the file's size, rounded up, in 512-byte blocks is n.  If n is followed by a c, then the primary is true if the file's size is n bytes (characters).  Similarly if n is followed by a scale indicator then the file's size is compared to n scaled as:

             k       kilobytes (1024 bytes)
             M       megabytes (1024 kilobytes)
             G       gigabytes (1024 megabytes)
             T       terabytes (1024 gigabytes)
             P       petabytes (1024 terabytes)
       -size n[cwbkMG]
              File uses n units of space.  The following suffixes can be used:

              `b'    for 512-byte blocks (this is the default if no suffix is used)

              `c'    for bytes

              `w'    for two-byte words

              `k'    for Kilobytes (units of 1024 bytes)

              `M'    for Megabytes (units of 1048576 bytes)

              `G'    for Gigabytes (units of 1073741824 bytes)

              The  size  does  not  count indirect blocks, but it does count blocks in sparse files that are not actually allocated.  Bear in mind that the `%k' and `%b' format specifiers of -printf handle sparse files
              differently.  The `b' suffix always denotes 512-byte blocks and never 1 Kilobyte blocks, which is different to the behaviour of -ls.

关于这个默认为什么是 512-byte block,我查了一下相关资料,应该是因为早起在 IBM AIX 系统上 du 的默认单位就是 512-byte block,这是一个 POSIX 标准。这点从 dd 等命令的默认大小也能看出来:

➜  test dd if=/dev/random of=test count=1
1+0 records in
1+0 records out
512 bytes transferred in 0.000074 secs (6905092 bytes/sec)
➜  test ll
total 8
drwxr-xr-x    3 John  staff   102B May 24 09:53 ./
drwxr-xr-x  118 John  staff   3.9K May 24 09:53 ../
-rw-r--r--    1 John  staff   512B May 24 10:02 test

而且在造出了一个刚好 512B 的文件之后,我将其复制一份加了一个字符,达到 515B,然后再来试试 find 命令:

➜  test ll
total 16
drwxr-xr-x    4 John  staff   136B May 24 10:02 ./
drwxr-xr-x  118 John  staff   3.9K May 24 09:53 ../
-rw-r--r--    1 John  staff   512B May 24 10:02 test
-rw-r--r--    1 John  staff   515B May 24 10:02 test2
➜  test find ./ -size 1
./
.//test
➜  test find ./ -size 2
.//test2
➜  test

可以看到,正如文档中描述了,find 会直接向上取整来进行比较,然后返回结果。

Git 统计代码量

最近有一个需求是要统计 Git 仓库里每个人的代码量,于是上网搜了一下,找了一些相关命令:

指定用户名版

git log --author="_Your_Name_Here_" --pretty=tformat: --numstat | awk '{ add += $1; subs += $2; loc += $1 - $2 } END { printf "added lines: %s, removed lines: %s, total lines: %s\n", add, subs, loc }' -

这句话可以输出当前项目内指定用户名的用户的代码量统计,结果如下:

added lines: 30400 removed lines: 21317 total lines: 9083

使用 ls-file 实现不指定用户版统计行数版

git ls-files -z | xargs -0n1 git blame -w | ruby -n -e '$_ =~ /^.*\((.*?)\s[\d]{4}/; puts $1.strip' | sort -f | uniq -c | sort -n

这段代码比较有意思,它扫描了当前分支的每个文件,然后用 Git 的 blame 功能输出每个人的代码行数,最后用系统命令 sort 和 uniq 实现计数。

结果如下:

   8 aaa
   9 bbb
 145 ccc
 146 ddd
 261 eee

扫描 Log 统计增删行数版

git log --shortstat --pretty="%cE" | sed 's/\(.*\)@.*/\1/' | grep -v "^$" | awk 'BEGIN { line=""; } !/^ / { if (line=="" || !match(line, $0)) {line = $0 "," line }} /^ / { print line " # " $0; line=""}' | sort | sed -E 's/# //;s/ files? changed,//;s/([0-9]+) ([0-9]+ deletion)/\1 0 insertions\(+\), \2/;s/\(\+\)$/\(\+\), 0 deletions\(-\)/;s/insertions?\(\+\), //;s/ deletions?\(-\)//' | awk 'BEGIN {name=""; files=0; insertions=0; deletions=0;} {if ($1 != name && name != "") { print name ": " files " files changed, " insertions " insertions(+), " deletions " deletions(-), " insertions-deletions " net"; files=0; insertions=0; deletions=0; name=$1; } name=$1; files+=$2; insertions+=$3; deletions+=$4} END {print name ": " files " files changed, " insertions " insertions(+), " deletions " deletions(-), " insertions-deletions " net";}'

这段比较复杂,我也没有认真解读,直接贴结果吧:

aaa,: 353 files changed, 9359 insertions(+), 3844 deletions(-), 5515 net
aaa,bbb,: 4 files changed, 144 insertions(+), 2 deletions(-), 142 net
ccc,: 114 files changed, 2301 insertions(+), 481 deletions(-), 1820 net
ddd,: 27 files changed, 1856 insertions(+), 757 deletions(-), 1099 net
eee,: 1726 files changed, 32841 insertions(+), 22719 deletions(-), 10122 net
eee,fff,: 13 files changed, 209 insertions(+), 211 deletions(-), -2 net
ggg,: 53 files changed, 1153 insertions(+), 1170 deletions(-), -17 net
fff,: 2445 files changed, 69875 insertions(+), 62148 deletions(-), 7727 net
fff,eee,: 30 files changed, 394 insertions(+), 472 deletions(-), -78 net
bbb,: 37 files changed, 781 insertions(+), 216 deletions(-), 565 net
hhh,: 4 files changed, 34 insertions(+), 4 deletions(-), 30 net

比较奇怪的是会列出两个人同时修改,可能是 merge 操作,没有深究。

扫描 Log 单独统计每个人的增删行数加强版

git log --format='%aN' | sort -u | while read name; do echo -en "$name\t"; git log --author="$name" --pretty=tformat: --numstat | awk '{ add += $1; subs += $2; loc += $1 - $2 } END { printf "added lines: %s, removed lines: %s, total lines: %s\n", add, subs, loc }' -; done

直接上输出:

aaa	added lines: 34, removed lines: 4, total lines: 30
bbb	added lines: 2301, removed lines: 481, total lines: 1820
ccc	added lines: 1856, removed lines: 757, total lines: 1099
ddd	added lines: 30400, removed lines: 21317, total lines: 9083
eee	added lines: 1153, removed lines: 1170, total lines: -17
fff	added lines: 1153, removed lines: 1170, total lines: -17
ggg	added lines: 72886, removed lines: 64233, total lines: 8653
hhh	added lines: 814, removed lines: 216, total lines: 598
iii	added lines: 9503, removed lines: 3846, total lines: 5657

第三方小工具版

使用这个工具可以直接输出非常漂亮的统计表格:

https://github.com/oleander/git-fame-rb

gem install git_fame
cd /path/to/gitdir && git fame
Total number of files: 2,053
Total number of lines: 63,132
Total number of commits: 4,330

+------------------------+--------+---------+-------+--------------------+
| name                   | loc    | commits | files | percent            |
+------------------------+--------+---------+-------+--------------------+
| Johan Sørensen         | 22,272 | 1,814   | 414   | 35.3 / 41.9 / 20.2 |
| Marius Mathiesen       | 10,387 | 502     | 229   | 16.5 / 11.6 / 11.2 |
| Jesper Josefsson       | 9,689  | 519     | 191   | 15.3 / 12.0 / 9.3  |
| Ole Martin Kristiansen | 6,632  | 24      | 60    | 10.5 / 0.6 / 2.9   |
| Linus Oleander         | 5,769  | 705     | 277   | 9.1 / 16.3 / 13.5  |
| Fabio Akita            | 2,122  | 24      | 60    | 3.4 / 0.6 / 2.9    |
| August Lilleaas        | 1,572  | 123     | 63    | 2.5 / 2.8 / 3.1    |
| David A. Cuadrado      | 731    | 111     | 35    | 1.2 / 2.6 / 1.7    |
| Jonas Ängeslevä        | 705    | 148     | 51    | 1.1 / 3.4 / 2.5    |
| Diego Algorta          | 650    | 6       | 5     | 1.0 / 0.1 / 0.2    |
| Arash Rouhani          | 629    | 95      | 31    | 1.0 / 2.2 / 1.5    |
| Sofia Larsson          | 595    | 70      | 77    | 0.9 / 1.6 / 3.8    |
| Tor Arne Vestbø        | 527    | 51      | 97    | 0.8 / 1.2 / 4.7    |
| spontus                | 339    | 18      | 42    | 0.5 / 0.4 / 2.0    |
| Pontus                 | 225    | 49      | 34    | 0.4 / 1.1 / 1.7    |
+------------------------+--------+---------+-------+--------------------+


CentOS Bash Proxy 设置

今天在服务器上做一个 Bash 代理的配置,想要将某些地址去除代理,于是搜了一下,基本上答案都是:

export no_proxy="localhost,127.0.0.1,192.168.0.0/24"

这样的答案。但是实际使用的过程中,我发现这跟我就是在误导别人,因为如果像上面那样写,你在访问 192.168.0.1 的时候会发现还是走了代理。

经过尝试,下面几种写法都是无效的:

127.0.0.0
127.0.0.0/8
127/8
127.*.*.*
127.

特此记录一下,避免后人踩坑。。。